Product type: Wordpress Plugin
Sell Downloads
Installing and Using the basic version of Sell Downloads
Installing and Using the premium version of Sell Downloads
Installation
To install Sell Downloads, follow these steps:
- Download and unzip the plugin
- Upload the entire "sell-downloads" directory to the "/wp-content/plugins /" directory
- Activate the plugin through the 'Plugins' menu in "WordPress"
- Go to "Sell Downloads > Sell Downloads Settings" and set up your store
Setting up Sell Downloads
Sell Downloads can be set up via the menu: "Sell Downloads > Sell Downloads Settings". The setup screen offers general settings for the Sell Downloads, allows entering the PayPal data required to process sales and texts that will be used for the email notifications.
Settings Interface
The setup interface includes the following fields:
URL of store page: Enter the URL of the webpage where the Sell Downloads was inserted. The URL of the store will be used to return from the product page to the store page.
Allow searching by taxonomies: Modifies the search process of WordPress to allow the products be found by their taxonomies.
Allow to filter by type: Inserts a field into the Sell Downloads webpage that allows to filter products by type (jpg, mp3, doc,....)
Store layout: Allows select one of the multiple layouts available for the store.
Allow multiple pages: Allows paging of Sell Downloads products.
Items per page: Defines the number of products per page in Sell Downloads.
Share in social networks: Display a group of buttons for sharing the products in the social networks(like Facebook, Twitter and Google+)
Facebook app id for sharing in Facebook: App id for sharing the website's links in Facebook.
Payment gateway data
Enable PayPal Payments: Allows the sale of products through PayPal.
PayPal email: Enter the email address associated with the PayPal account.
Currency: Symbol of the currency in which payments are accepted.
PayPal language: Preferred language of the PayPal interface.
PayPal button: Select the PayPal button design.
Download link valid for: Set an expire time for the download links.
Number of downloads allowed by purchase: Set the number of downloads allowed by product's purchased.
Allows request to the users the acceptance to save cookies. If check the box the customers should accept store cookies to use of shopping cart.
Text for requesting the acceptance of cookies.
Discount settings
Percent to discount: Enter the percent to discount to the total sale cost.
Valid for sales over than: Apply discount to sales superior to this value.
Valid from (dd/mm/yyyy): Apply discount from the entered date.
Valid to (dd/mm/yyyy): Apply discount until the entered date.
Promotional text: Text to promote the discount.
Coupon settings
Percent to discount: Enter the percent to discount to the total sale cost.
Coupon: Enter the coupon code.
Valid from (dd/mm/yyyy): The coupon is valid from the entered date.
Valid to (dd/mm/yyyy): The coupon is valid to the entered date.
Notification Settings, both for buyers to complete a payment, and the store manager
Notification "from" email: E-mail address that will appear as the sender of notifications.
Send notification to email: Email address where a notification is sent after each sale.
Subject of user confirmation email: Subject of the confirmation email sent to the customer when making the purchase.
Email confirmation to user: Body of message sent to the client when making the purchase. The message should include the tag %INFORMATION% which will be replaced by the purchase data.
Subject of email notification to admin: Subject of email notification sent to the administrator when a purchase is made.
Email notification to admin: Body of the email message sent to the administrator when a purchase is made. The message text should include the tag %INFORMATION%, which will be replaced by the purchase data.
Into the body of notification emails it is possible to include other two constants: %DATETIME% that would be replaced by the purchase date/time, and "%BUYERNAME%" that would be replaced by the first name and last name of the buyer (if there is an user in the website with the payer's email).
Creating product
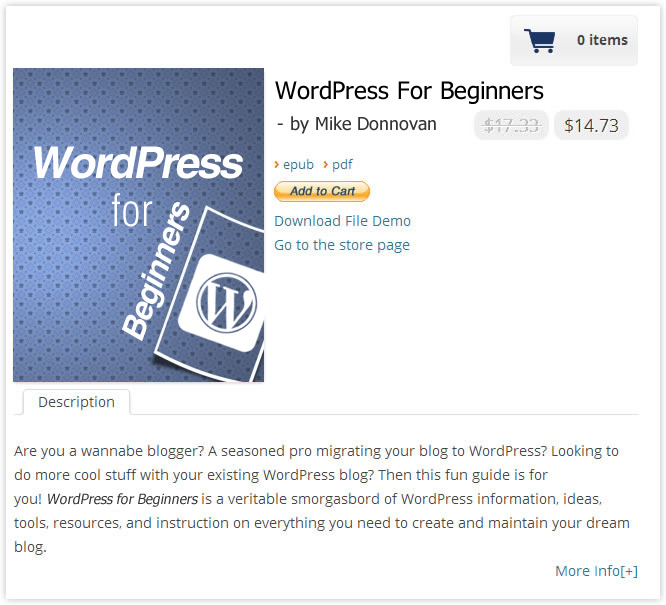
The Sell Downloads allows to sell possible digital files (video, audio, documents, etc). To create a product press the menu option "Sell Downloads > Products for Sale". Initially it displays the list of products entered previously and a set of data associated with the product: Product Name, File Type, Downloads, Purchases and Date

Product Section
To enter a new product/file press "Add New".
The interface for entering data pertaining to a product is described below:
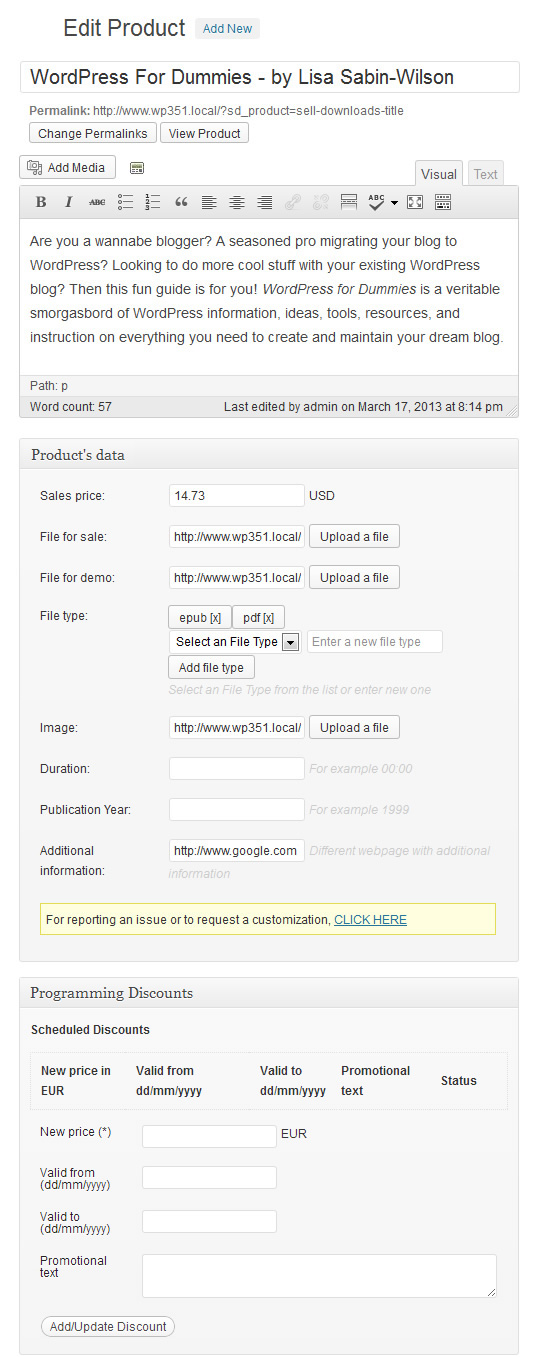
Product Edition
Product's data
Enter Title Here: Enter the title-name of the product.
Description: Description of the product. This field is optional, but offers the opportunity to provide additional information about the product.
Sales Price: Retail price of the product.
File for sale: URL of the file to sell. The button associated with the field displays the WordPress media gallery making it easy to select the file.
File for demo: URL file demo. The button associated with the field displays the WordPress media gallery making it easy to select the file.
File Type: Select a file type from the list or enter a new one if it is not yet on the list.
Image: URL of an image that represents the product. The button associated with the field displays the WordPress media gallery making it easy to select the file.
Duration: Enter a value with time format. Useful for Audio and Video files.
Publication Year: Enter a value with year format. Useful for files associated with a date, as the creation or publication date , for example a book or monograph.
Additional Information: URL of a webpage with additional information about the product.
Programming discount
New price: The new price to apply to the product.
Valid from (dd/mm/yyyy): Apply discount from the entered date.
Valid to (dd/mm/yyyy): Apply discount until the entered date.
Promotional text: Text to promote the discount.
Publishing the Sell Downloads
The Sell Download can be posted on a page or post of WordPress. To insert the "Sell Downloads" go to the relevant section (page or post) and press the Sell Downloads button above the content editor of post/page, the action displays a setup screen.
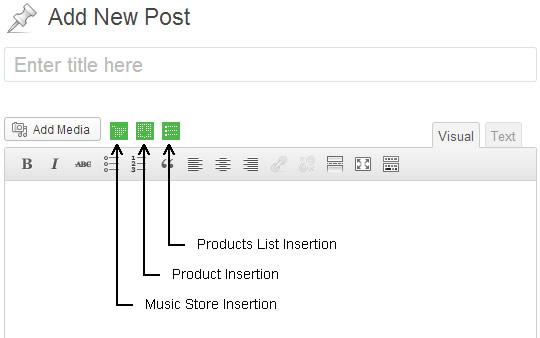
Insertion Button
Interface for insertion dialog
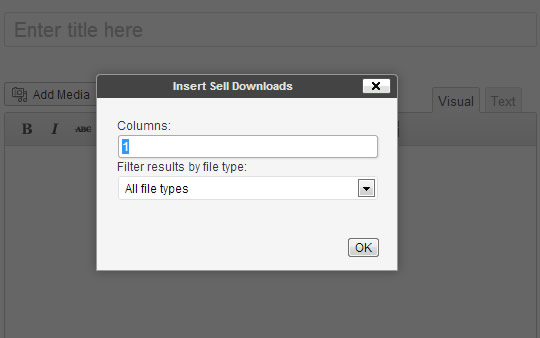
Insertion Interface
Filter results by products type: by default, displays only products that belong to a specified type.
Columns: Defines the number of columns for the store products.
The insertion process generates a shortcode which will be replaced by the store when it is displayed on the website.
Note: After inserting the store on a page of your WordPress, it is advisable to copy the URL of the relevant page, and enter in the Sell Downloads setup section, to allow the users to return to the store from the product page.
Shortcode attributes
Through the shortcode it is possible define some attribute for change the store's settings:
columns: Enter the number of columns to display the products in the store with a grid format. By default the value of "columns" attribute is 1.
[sell_downloads columns="3"]
type: Enter the slug or id of the products' type you want to display in the store. By default the value of "type" attribute is "all".
[sell_downloads type="book"]
exclude: Enter the ids of the products to exclude from the store.
[sell_downloads exclude="123,456"]
filter_by_type: The values allowed are 1 or 0, and shows or hide the filtering by product's type in the header section of the store's page.
[sell_downloads filter_by_type="1"]
show_order_by: The values allowed are 1 or 0, and shows or hide the "Order by" options in the header section of the store's page.
[sell_downloads show_order_by="1"]
order_by: The values allowed are: post_date, post_title, popularity, price_low_high, and price_high_low. Allows ordering the products in the store's page by the criteria defined in the attribute.
[sell_downloads columns="3" order_by="post_title"]
Interface for insertion dialog of product
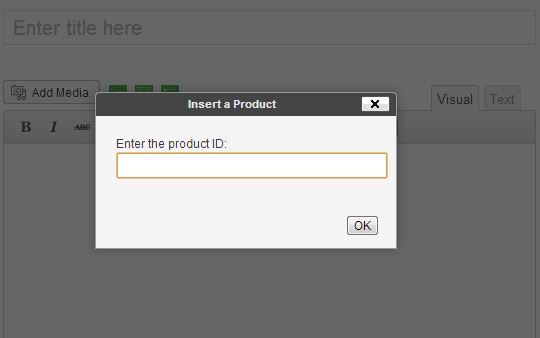
Insertion Interface for Product
The insertion process generates a shortcode which will be replaced by the product when it is displayed on the website.
Inserting products list and products on pages and sidebars
Interface for insertion dialog of product list
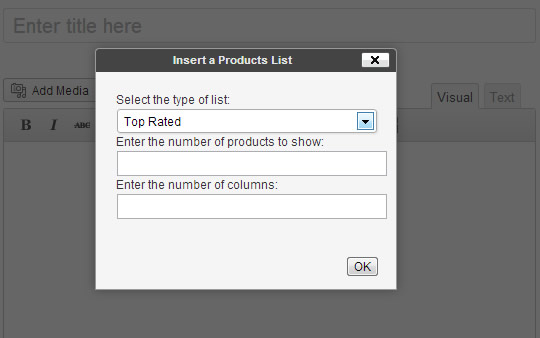
Insertion Interface for Products List
- Select the type of list: it is possible insert the list of top rated products, the newest or top selling.
- Number of products to show: enter the number of products to display in the list.
- Number of columns: enter the number of columns.
The insertion process generates a shortcode which will be replaced by the list of products when it is displayed on the website.
The shortcode for products list includes supports other attributes like:
file_type: accepts a file type id or slug, or multiple files types ids and/or slugs: [sell_downloads_product_list columns="1" number="3" type="top_rated" file_type="the-file-type-slug"]
category: accepts a category id or slug, or multiple categories ids and/or slugs: [sell_downloads_product_list columns="1" number="3" type="top_rated" category="the-category-slug"]
Products and Products List can be Inserted as Widget in Website's Sidebar
Sale Statistics
When a sale takes place, a notification email is sent to the Sell Downloads administrator. However, sales can also be reviewed in Sales Reports. To do this, go to option "Sell Downloads > Sales Reports"
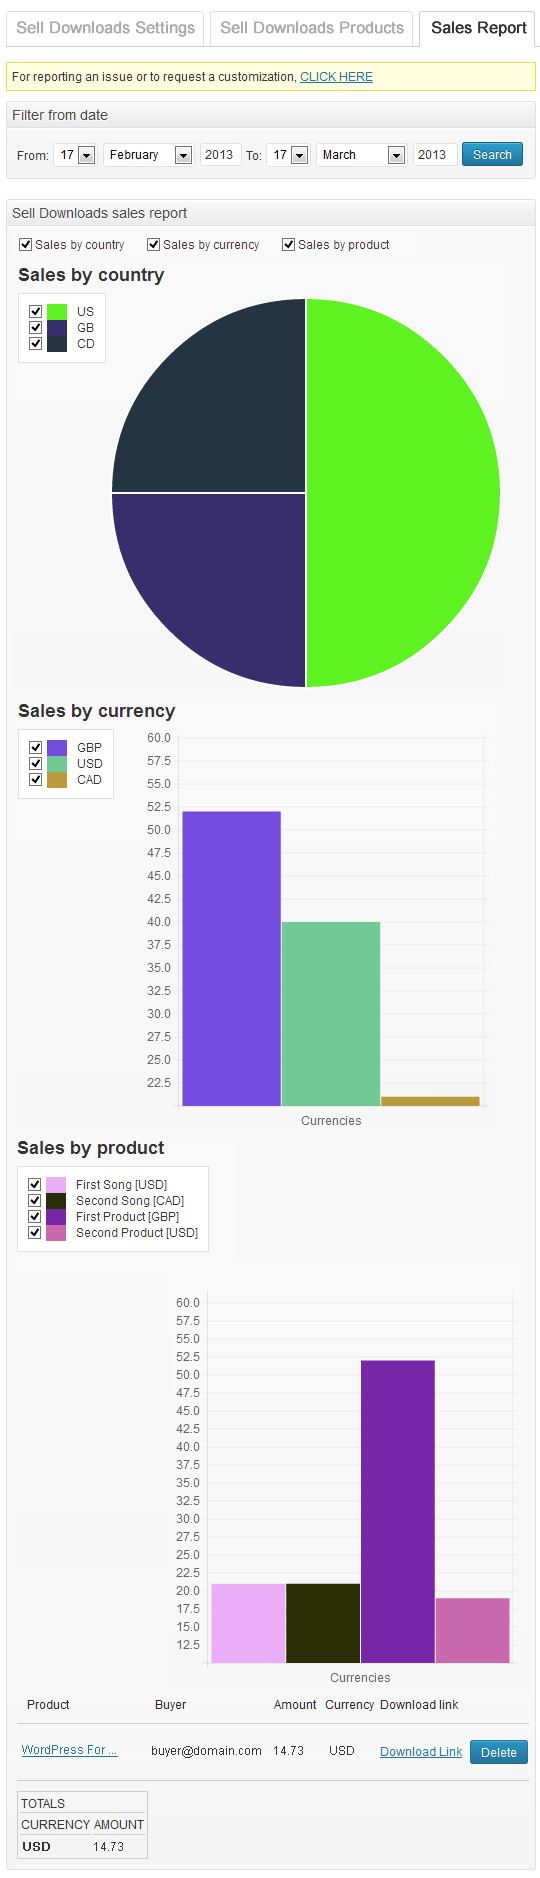
Sales Report
The Reports section allows you to filter sales reports over a specific period, by default it shows the current day's sales. It also shows sales' totals for the selected period and the currency of the sales.

Filter Report
The "Sell Downloads" allows to display specific charts by currencies, countries and products.
You can delete a sales report from the list of sales. This may be useful in case of a refund granted to a buyer, and allows to keep your sales statistics updated with the actual purchases.
Affiliate Royale Add On
The add on allows integrate the Store with the Affiliate Royale plugin (both plugins must be installed in the website)
Affiliate Royale is a complete Affiliate Program plugin for WordPress. Use it to start an Affiliate Program for your products to dramatically increase traffic, attention and sales. Once you launch your affiliate program with Affiliate Royale you'll be able to easily track your affiliates to see how they're doing. You'll see how many clicks they're driving, sales they're making and how much to pay them at the end of each month.

Affiliate Royale Section in the store's settings.
Filters and Actions
Filter: sell-downloads-title, parameters: title, product id
Filter: sell-downloads-votes, parameters: votes, product id
Filter: sell-downloads-cover-url, parameters: cover url, product id
Filter: sell-downloads-time, parameters: time, product id
Filter: sell-downloads-year, parameters: year, product id
Filter: sell-downloads-info, parameters: info url, product id
Filter: sell-downloads-content, parameters: content, product id