
- Calendars
- Appointment Booking Calendar
- Booking Calendar Contact Form
- CP Multi View Calendar
- Content Tools
- Music Store
- Sell Downloads
- Image Store
- Search In Place
- Theme Switch in Mobile and Desktop
- Corner Ad
- Loading Page
- CodePeople Post Map
- Related Posts
- Music Player for WooCommerce
- Music Player for Easy Digital Downloads
- Galleries
- Smart Image Gallery
- Forms
- CP Contact Form with PayPal
- Calculated Fields Form
- CP Easy Form Builder
- Contact Form to Email
- CP Polls
- Payment Form for PayPal Pro
- Themes
- CodePeople Light
- Food & Diet
- Custom requests
- Quote for custom Calculated Fields formulas

Product type: Wordpress Plugin
CP Easy Form Builder
CP Easy Form Builder is a Wordpress plugin that allows to create forms and email them.
It makes it easy to create contact forms, booking forms, or other types of forms that capture information via your website.
It has a visual interface for creating the form with field validation included in all versions. Other features are available depending of the version: additional form fields, uploads, auto-reply / copy to user, etc...
Some of its features are inspired in a form to mail for Dreamweaver previously developed and extensively tested, which helped to get a stable plugin from its first version.
FEATURES
- Allows to create forms visually, with a modern and simple interface
- Sends form data to the email addresses that you provide
- Supports file uploads
- Multiple field types and section separators for building the form
- Allows to include additional user information (IP, user-agent)
- Allows to customize the text of email messages
- Allows to send an automatic "Thank you / Confirmation" message to the user who filled in the form. (*)
- Optionally, a copy of the entered data can be included in that message.
- Includes validation of the form data: required fields, emails, dates, number, etc.
- Includes an anti-spam system with Captcha image validation
- Forms are processed using Ajax: more speed and comfort for the user
(*) Some features are only available in the Pro version.
Installation
To install the WordPress plugin follow these steps:
- Unzip the downloaded file and copy the files into the folder "/wp-content/plugins".
- Configure the settings at the administration menu >> Settings >> CP Easy Form Builder.
- To insert the form into some content or post use the icon that will appear when editing contents:
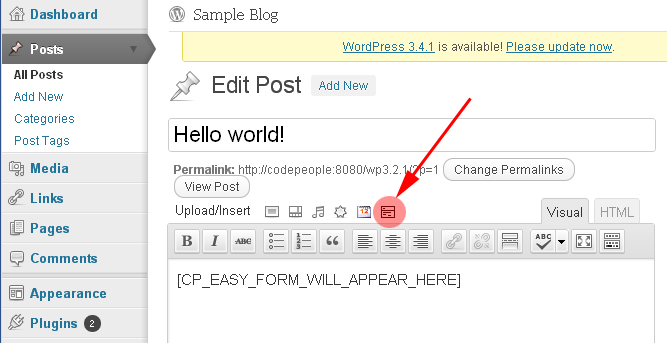
- After doing that, the tag [CP_EASY_FORM_WILL_APPEAR_HERE] will be inserted into your content. When you preview the content in the public website that tag will be replaced by the reservation form.
Creating the Forms

When you install the plugin, a default form is created automatically: a classic contact form. Next to it, you will find several kinds of fields that you can add to the form:
- Single Line Text: A text field consisting of only one line
- Number: A one line text field that must contain a number
- Email: A one line text field that must contain an email address
- Date: A field to select a date
- Paragraph Text: A text field consisting of several lines (TEXTAREA)
- Checkboxes: Classic checkboxes, when several options need to be selected
- Multiple Choice: also known as "radio buttons"
- Dropdown: A dropdown select box allowing to select one option out of several
- Upload file: For uploading files
- Password: A field that shows * instead the typed letters. You can also add a confirm password validation.
- Phone field: A customizable multiple-box phone field
- Comment area: A text that can be inserted in the middle of the form to add instructions to the users
- Section Break: A visual separator to divide form sections
- Page Break: Useful for creating multi-page forms. The "page break" marks the start of a new page in the form builder
Other features in the form builder:
- Equal fields validation: Use it for example to confirm if the email or password typed in two different fields are the same. This is valid for "Single Line Text", "Password" and "Email" fields.
- Dependent fields: Use this feature for show/hide fields (any field type) based in the selection made on other fields (checkboxes, radiobuttons or select/drop-down fields).
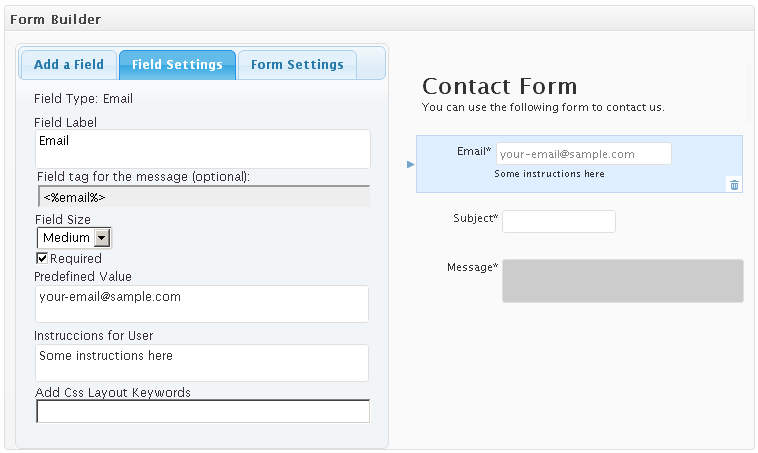
To add a field: Drag & drop the type of field you need into your form.
To change the position of a field: Drag & drop the field into desired position.
To delete a field: Click on the field to select it , then use the waste bin icon in the bottom right corner to delete it.
To edit field properties: Click on the field to select it, then go to the tab "Field Settings", where you will be able to change the size, label, name, default value / state, as well as add CSS style and/or define whether it is a required field or not.
To edit form properties: Click on "Form Settings" tab, where you will be able to change the header of the form and decide the type of form's alignment: Top Aligned, Left Aligned or Right Aligned.
The field tag for the message are optional tags lets you to place the value entered on that field into the notifications/confirmation email messages.
Form Processing / Email Settings
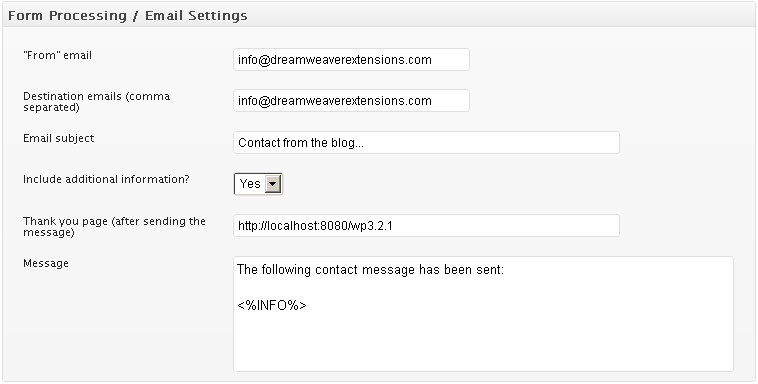
The second part of the setup refers to the email message that will be sent to the provided addresses. This setup area has the following fields:
- "From" email: the email address that will be used as "from" address in the email messages
- Destination emails: the email addresses to which a copy of every form will be sent whenever it is filled in. To include more than one address, separate them with a comma.
- Email subject: Subject line of the email message
- Include additional information: indicates if you wish to receive the IP of the user who filled in the form
- Thank you page: Address of the page to which the user will be redirected after sending the form successfully; usually it is a confirmation or "thank you" page.
- Message: Text of the message to be sent, the tag <%INFO%> will be replaced by the information sent using the form. Tags for specific fields can be added in this way:
<%fieldname1%>
<%fieldname2%>
...
...were "fieldname1" is the name of the field that appears in the form builder.
Email Copy to User
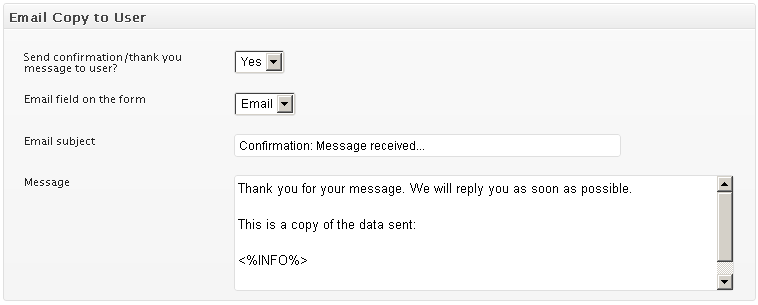
You also have the possibility to send an email message to the user, who filled in your form, confirming that it was well received, thanking for filling it in, and, when applicable, indicating when a response can be expected. The fields are:
- Send confirmation/thank you message to user?: indicate here if you wish to send such confirmation message
- Email field on the form: Select which form fields will be included in the email message sent to the user
- Email subject: Subject line of the email message
- Message: Text of the email message itself. The tag <%INFO%> will be replaced by the information sent using the form, if needed. Tags for specific fields can be added in this way:
<%fieldname1%>
<%fieldname2%>
...
...were "fieldname1" is the name of the field that appears in the form builder.
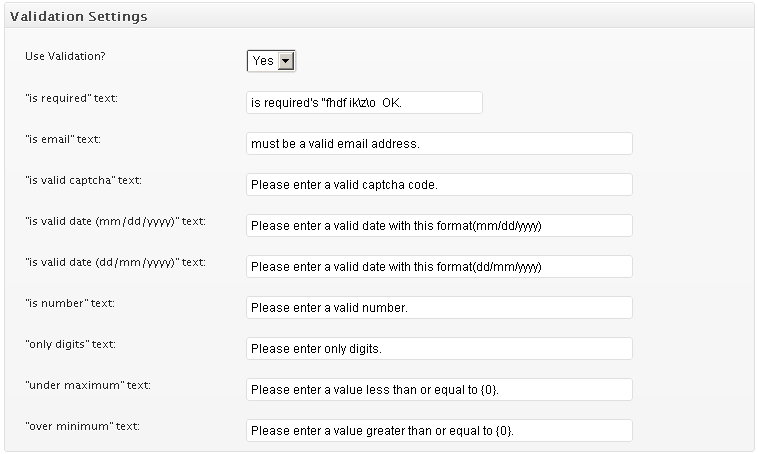
Validation Settings
This area contains texts of the validation messages which you can specify in the language of your website or change as you please.
Captcha Verification
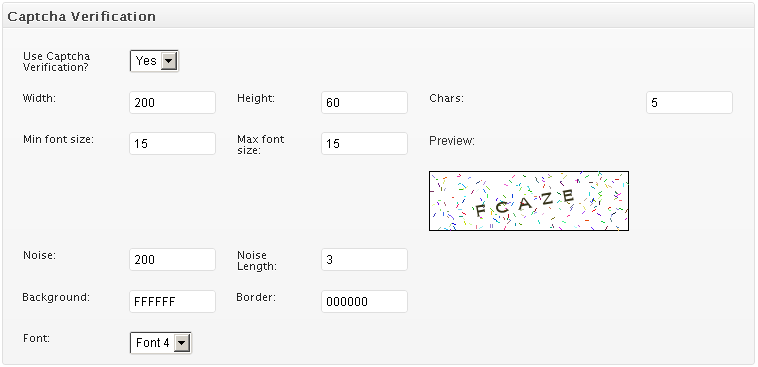
In this area you can indicate if you wish to use captcha image verification and set it up. The setup fields are:
- Use Captcha Verification: select if you wish to use Captcha.
- Width: Captcha image width
- Height: Captcha image height
- Chars: Amount of characters in the code that needs to be identified
- Min font size: Minimum size of the characters to be identified in the Captcha image
- Max font size: Maximum size of the characters to be identified in the Captcha image
- Noise: The amount of "noise" (reading difficulty) to be added to the Captcha image
- Noise Length: Length of the "noise" lines
- Background: Captcha image's background color
- Border: Captcha image's border color
- Font: Font used as base to create a Captcha code
DOWNLOAD
- Supports one form per website
- Doesn't include technical support (60 days of support service can be purchased for EUR 25)
No registration required.
- Includes full set of fields
- Supports file uploads
- Supports multiple forms per website
- Supports tags for specific form fields into the email
- Includes the email copy to the user
- Multi-site compatible
- Includes all future updates and improvements made to this version
- Includes 60 days of technical support
|
After payment you will be redirected to a direct-download page and the download link will be emailed to the payment address.
The cost of the pro version is a one-time payment required to download it. The one-time payment gives you right to use the plugin in your websites for an unlimited time, access to future updates and access to 60 days of free technical support. |