CodePeople Post Map allows to associate geolocation information to your posts and to integrate your blog with Google Maps in an easy and natural way.
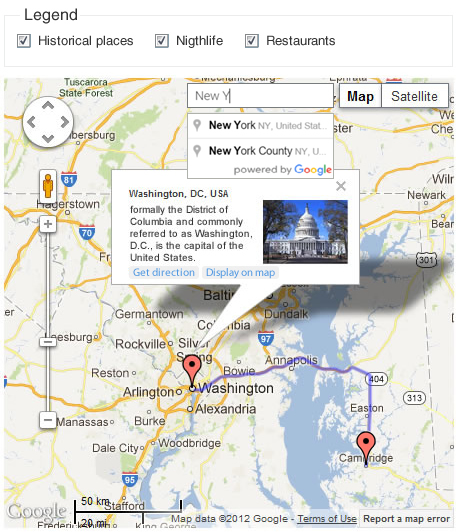
CodePeople Post Map draws the route between points in the post.
CodePeople Post Map allows to insert a Google Map in a post or in any of the WordPress templates that display multiple posts: home page, archive, category, search results.
The map inserted in a single post displays a marker at the position indicated by the geolocation information pertaining to the post, but also shows markers of the last posts published in related categories. The number of markers to display can be set in the plugin's settings.
The map inserted into a template displaying multiple posts will contain as many markers as posts making up the page with the associated geolocation info. When the mouse is hovered over the marker, the post to which it belongs gets highlighted.
CodePeople Post Map has a wide range of settings to make your maps more versatile and adaptable.
Note: If you are using Dreamweaver rather WordPress to build your website, there is a Google Maps Inserter for Dreamweaver with similar features.
FEATURES
CodePeople Post Map in action.
Main Features:
The plugin is capable of dealing with large volumes of dots or markers.
Another way for users to discover additional entries related to the post.
The location information can be defined by physical address or point coordinates.
The location information and description may be used in posts search (only for advanced plugin version).
Allows addresses in different languages.
Allows to insert a map in the best position within your blog or simply associate the geolocation information to the post but without displaying the map.
Generates dynamic points from the geolocation information, stored in the image's metadata when it is uploaded to WordPress.
Generates dynamic points on map, relative to the geolocation information, assigned to the posts from WordPress App.
Allows to associate a map to all public post types in WordPress (page and post are accepted by default)
Allows to insert the map as widget on sidebars.
Allows grouping multiple markers in clusters.
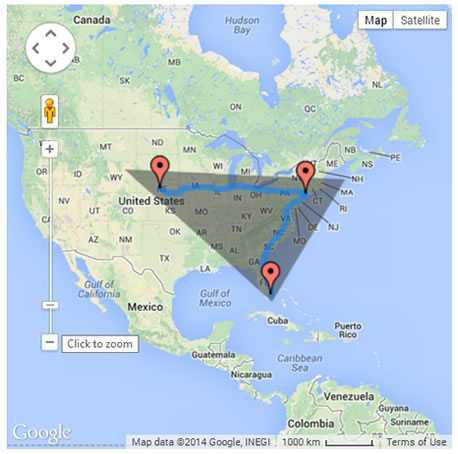
Allows to display a Shape layer on map.
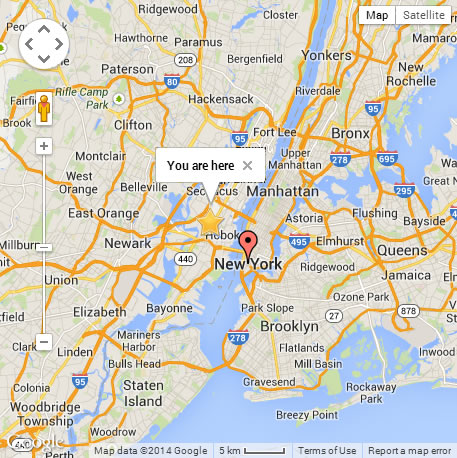
Allows to display the user's location on map.
Refresh the user's location each X milliseconds.
Draws the route between points in the post (allows draw the route with polylines).
Markers customization.
Allows to display or hide the bubbles with markers information.
Allows to display a bubble opened by default.
Allows to display a link to get directions to the point.
Allows to display a link to open the point directly on Google Maps.
Allows to display a link to display directly the street view in the specific point.
Allows to display a traffic layer over the map.
Allows to include a search box on the map for searching additional places.
Based on Google Maps Javascript API Version 3.
Allows to embed maps in multiple languages.
Displays markers belonging to posts of the same categories.
Allows to display all markers that belong to a specific category.
Allows to display all markers on the website.
Allows to display the points that belong to the posts with a specific tag.
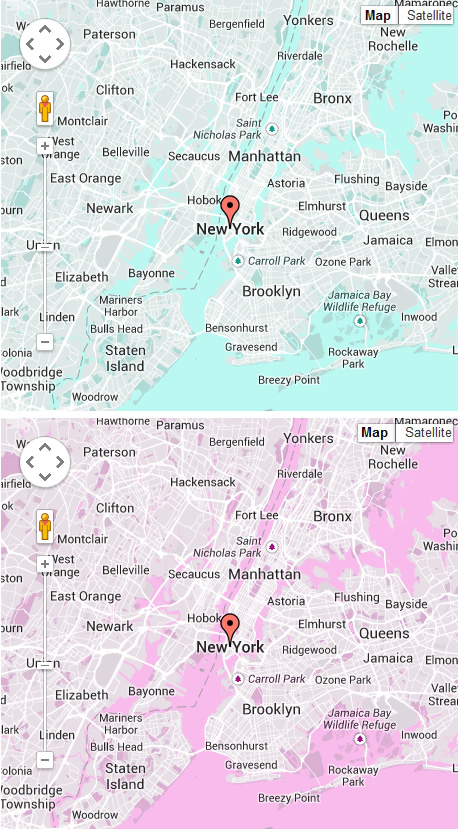
Allows to styling the map.
Allows to create a legend with categories, tags, or custom taxonomies, and display or hide the points, checking or unchecking legend items.
Several customization options are available: initial zoom, width, height, margins, alignment, map type, map language, the way the map is displayed in a single post (either fully deployed or icon to display map), enable or disable map controls, the number of points plotted on a map, as well as the class that will be assigned to the post when the mouse hovers over the marker associated with the post.
Allows to export all points defined in the website to a CSV file.
Allows to import the points from a CSV or KML file.
Allows to load a KML layer on the map from a KML file.
Note: The geolocation information is stored in image's metadata from mobiles or cameras with GPS devices.
Note: If you need additional information about stylize the maps, Click Here
Developer Version Features
Allows design a Contact Form, and associate it with the points by using the [cpm-contact-form label="Click Here"]
Allows send notification emails with the information included in the form by the users.
Allows associate an email address to the points, to contact a different person by each point, or a global email address to be notified from all points.
Supports Contact Form 7 plugin's forms in the points' descriptions by inserting their shortcodes ( [contact-form-7 id="1" title="Contact Form" label="Click Here"] )
Allows to use the image associated with the point as the point's icon on map.
Allows to export all points defined in the website to a CSV file.
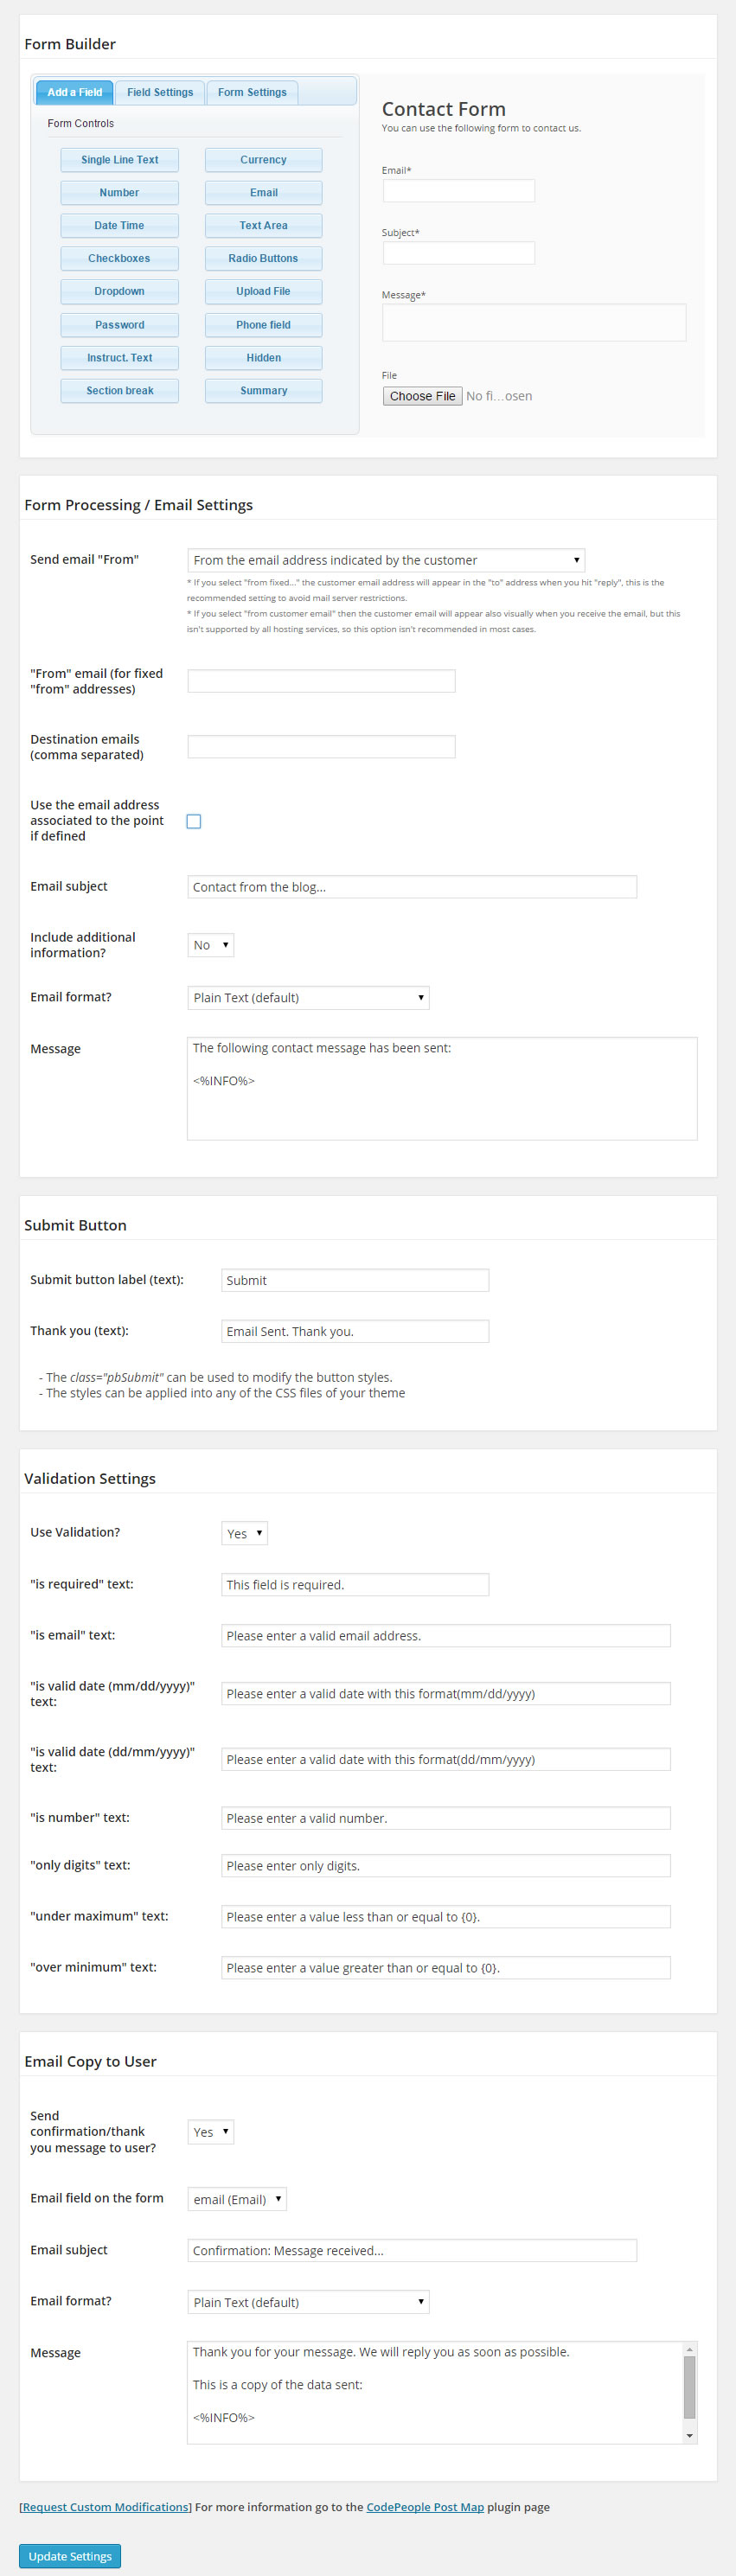
Contact Form Builder (Developer Version).
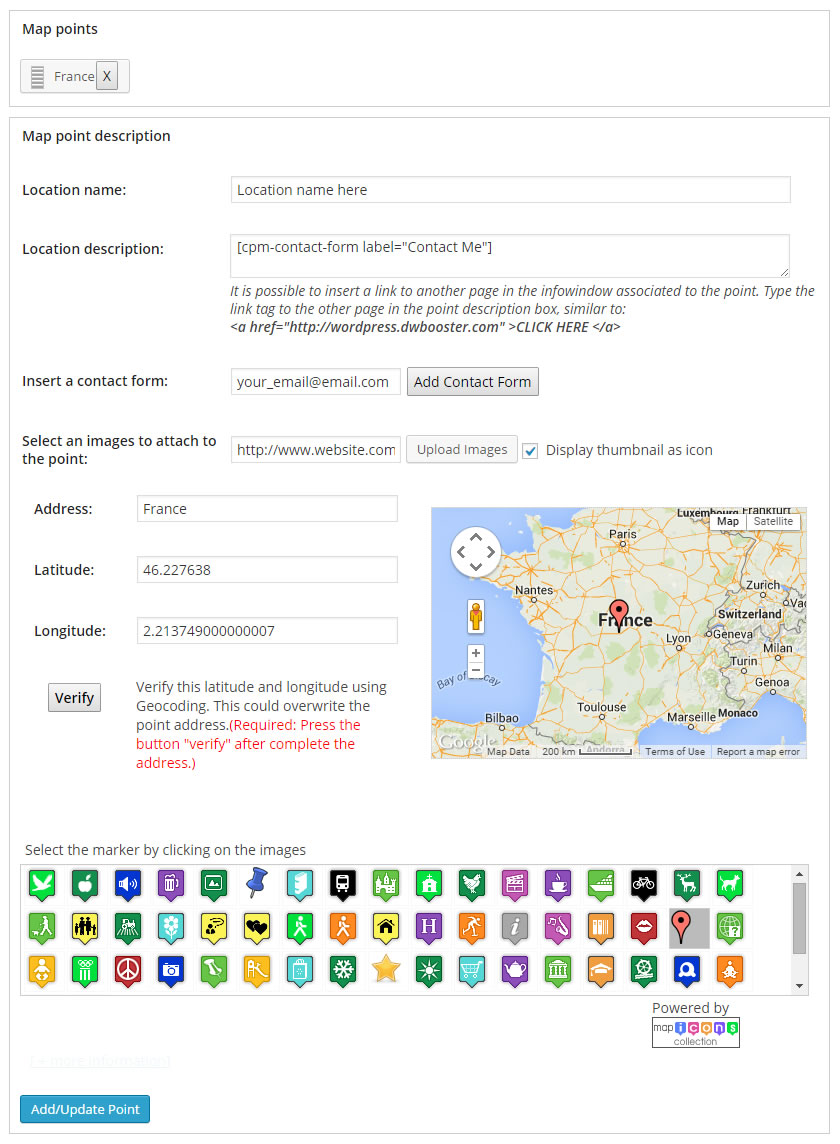
Point Settings (Developer Version).
Import/Export Section (Developer Version).
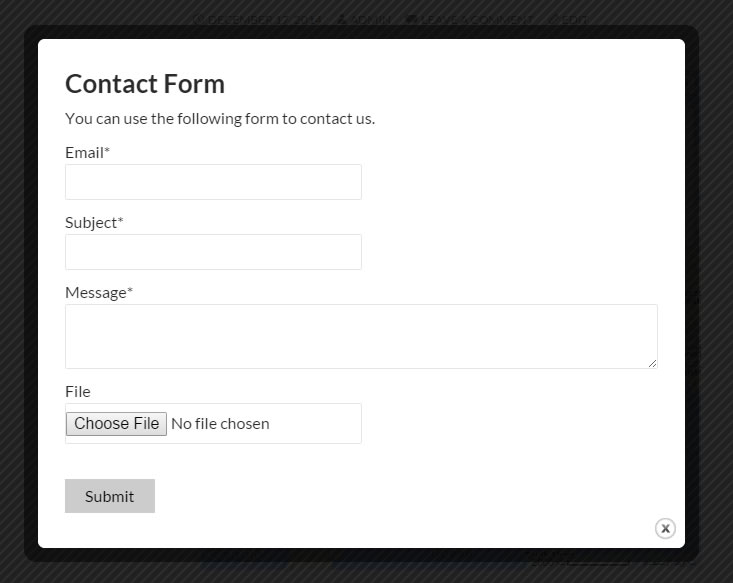
Contact Form in Action (Developer Version).
Live demo
You can test the following live demo of the pro version:
To install CodePeople Post Map, follow these steps:
Download and unzip the plugin file.
Upload the codepeople-post-map folder to the /wp-content/plugins/ folder on your server.
Activate the plugin through the menu option "Plugins" in your WordPress dashboard.
Supported Languages
English
Spanish
French
Portuguese
Product type: Wordpress Plugin
CodePeople Post Map
Screenshots and Description
CodePeople Post Map in action.
If the image includes geolocation information in its metadata, a point is generated dynamically with the geolocation information.
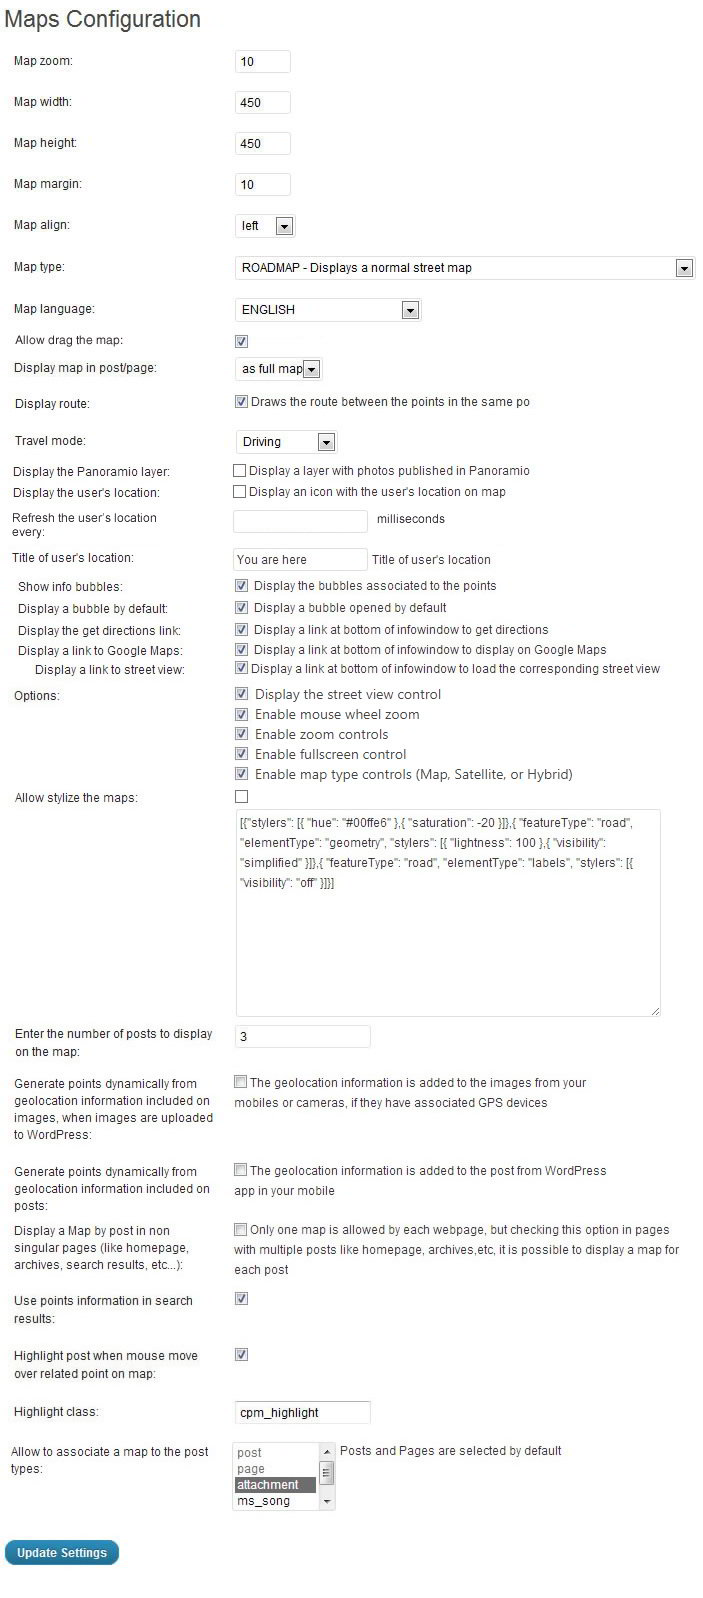
CodePeople Post Map offers several setting options and is highly flexible. Options can be set up in the Settings page (and will become the default setup for all maps added to posts in the future), or may be specific to each post to be associated with the map (in this case the values are entered in the editing screen of the post in question.)
The settings are divided into two main groups, those belonging to the map and those belonging to the geolocation point.
Map configuration options:
Map zoom: initial map zoom.
Map width: Width of the map.
Map height: Height of the map.
Map margin: Margin of the map.
Map type: Select one of the possible types of maps to load (roadmap, satellite, terrain, hybrid).
Map language: a large number of languages is available to be used on maps, select the one that matches your blog's language.
Allow drag the map: allows drag the map to see other places.
Display map in post / page: When the map is inserted in a post you can select whether to display the map or display an icon, which displays the map, when pressed (if the map is inserted into a template that allows multiple posts, this option does not apply)
Display route: Draws the route between the points in the same post.
Display a search box for places: Includes an input box on the map for searching places.
Use poyline: Allows draw the routes using polylines.
Show info bubbles: display or hide the bubbles with the information associated to the points.
Display a bubble by default: display a bubble opened by default.
Travel mode: The travel mode to use in the route's drawing.
Include traffic layer: Displays a traffic layer over the map.
Options: This setting allows you to select which map controls should be available.
Display a bundle of points in the same area, like a cluster: Allows grouping multiple markers in clusters.
Display the user's location: Displays a marker with the location of user that is visiting the webpage.
Refresh the user's location every: Integer number that represent the interval in milliseconds to refresh the user's location.
Title of user's location: Enter the title of infowindow belonging to the user's marker.
Display the get directions link: Displays a link in the infowindow to get the direction to the point (available only in the premium version of plugin)
Display a link to Google Maps: Displays a link in the infowindow to load the point directly on Google Maps.
Display a link to Street View: Displays a link in the infowindow to display the street view in the specific point.
Generate points dynamically from geolocation information included on images, when images are uploaded to WordPress: If the image uploaded to WordPress includes geolocation information is generated a point with related to the geolocation information.
Generate points dynamically from geolocation information included on posts: Displays new points on maps, if the post includes geolocation information, generated by WordPress App.
Enter the number of points on the post / page map: When the map is inserted into a post, points that belong to the same categories will be shown on the same map. This option allows you to set the number of points to be shown. When the map is inserted into a template that allows multiple posts this option does not apply.
Allow stylize the maps: Allows to define a JSON object to stylize the maps.
Display maps legends: Check the option to display a legend with categories, tags, or custom taxonomies, to display or hide the points on map dynamically.
Select the taxonomy to display on legend: Select the taxonomies to display on legend.
Enter a title for legend: Enter the title to display in the legend.
Enter a classname to be applied to the legend: To customize the legend appearance, associate to it a classname, and set the class definition in any of style files in your website.
Display a Map by post in non singular pages (like homepage, archives, search results, etc...):Only one map is allowed by each webpage, but checking this option in pages with multiple posts like homepage, archives,etc, it is possible to display a map for each post.
Highlight post when mouse hovers over related point on map: When the map is inserted into a template that allows multiple posts, hovering the mouse over one of the points will highlight the associated post through assignment of a class in the next setup option.
Highlight class: Name of the class to be assigned to a post to highlight when the mouse is hovered over the point associated with that post on the map.
Allow to associate a map to the post types: Select the post types that allow to associate a map to them. The page and post are selected by default.
Note: If you need additional information about stylize the maps, Click Here
Configuration options related to the location points
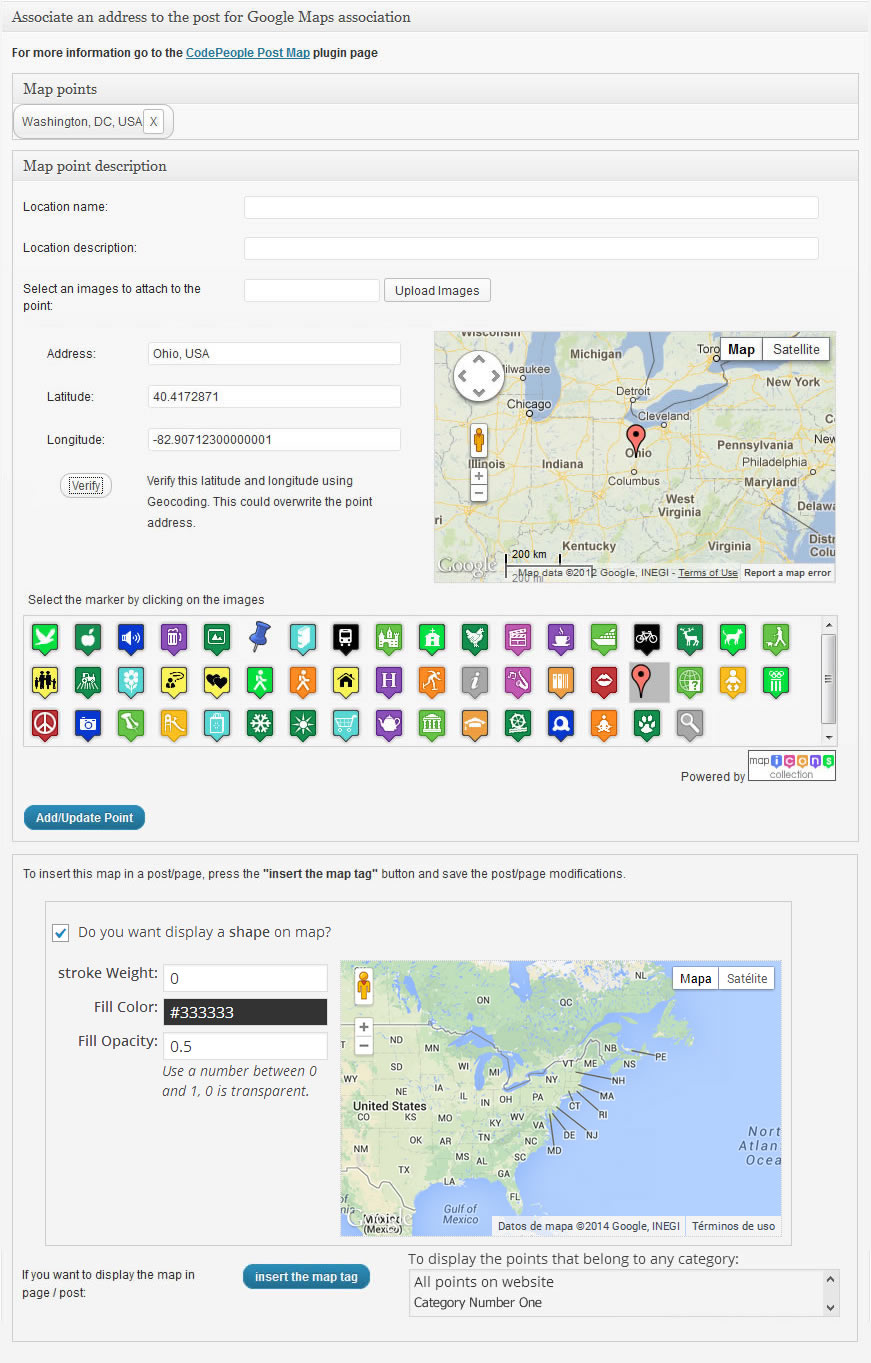
Map points: List of points (markers) inserted on map. Through the point selection from the list is possible to edit its data.
Location name: Name of the place you are indicating on the map, alternatively, the name of the post can be used.
Location description: Description of the place you are showing on the map. If left blank, the post summary will be used.
Select an image from media library: Select an image to associate with the localization point.
Address: Physical address of the geolocation point.
Latitude: Latitude of the geolocation point.
Longitude: Longitude of the geolocation point.
Verify: This button allows you to check the accuracy of the geolocation point address by updating the latitude and longitude where necessary, and display a map to correct the marker's coordinates.
Map: Allows to change the marker position to update the latitude and longitude values.
Select the marker by clicking on the images: Select the bookmark icon to show on the map.
Add/Update Point: Add a map point to the list.
Insert the map tag: Inserts a shortcode in the content of the post where the map is displayed with the features selected in the setup. You can attach geolocation information to a post but choose not to show a map in the content of the post. In case you do want to display a map in the post content, use this button.
Note 1: To display all points that belong to a specific category, it is required to insert the following shortcode [codepeople-post-map cat="3"]. The number 3 represent the category ID, replace this number by the corresponding category's ID. To insert the code directly in a template, the snippet of code would be:
Note 2: To display all points that belong to more than one category, separate the categories IDs with the comma symbol [codepeople-post-map cat="3,5"]. The numbers 3 y 5 are the categories IDs, replace these numbers by the corresponding categories IDs. To insert the code directly in a template, the snippet of code would be:
Note 3: To display all points on website, use -1 as the category's ID: [codepeople-post-map cat=-1] or <?php echo do_shortcode('[codepeople-post-map cat=-1]'); ?> for template.
Note 4: To display all points that belong to the posts with a specific tag assigned, for example the tag name "mytag", use the shortcode's attribute "tag", as follows: [codepeople-post-map tag="mytag"] or <?php echo do_shortcode('[codepeople-post-map tag="mytag"]'); ?> for template.
Note 5: To display all points in posts with a specific taxonomy assigned, or multiple taxonomies, should be used the "taxonomy" attribute in the shortcode, with the list of all taxonomies separated by the comma symbol, for example: taxonomy="taxonomy1,taxonomy2", and a new attribute for each taxonomy with the values corresponding. For example if you want select the points that belong to the posts with the values: "value1" for "taxonomy1", the shortcode would be: [codepeople-post-map taxonomy="taxonomy1" taxonomy1="value1"], for multiple taxonomies: [codepeople-post-map taxonomy="taxonomy1,taxonomy2" taxonomy1="value1" taxonomy2="value2,value3"].
Note 6: To display the points belonging to specific posts or pages, enter their ids separated by comma through the "id" attribute in the shortcode as follows: [codepeople-post-map id="123"]. To insert the code directly in a template, the snippet of code would be:
The "id" attribute has preference over the rest of the filtering attributes.
The point edition in the developer version of the plugin is a little different, and includes new options
Point Settings (Developer Version).
Insert a contact form: allows to associate an email address to the point, and insert a contact form shortcode in the "Description" box
Note: The contact form shortcode accepts the label attribute. The label attribute is used as the value of button included in the infowindows, to open the Contact Form
Display thumbnail as icon: uses the images selected as point's thumbnail, as the point icon on map
The complete list of attributes allowed in the map's shortcodes
width: Values allowed, number or percentage. Defines the map's width. [codepeople-post-map width="300"] or [codepeople-post-map width="100%"]
height: Values allowed, number or percentage (In the web's development, the height in percentage is effective only if the parent element has a height defined). Defines the map's height. [codepeople-post-map height="300"]
align: Values allowed, left, right, center. Aligns the map's container to the left, right or center. [codepeople-post-map align="center"]
dynamic_zoom: Values allowed, 1 or 0. Adjust the zoom of map dynamically to display all points on map at the same time. [codepeople-post-map dynamic_zoom="1"]
zoom: Accepts a number to define the map's zoom. To apply a zoom to the map, the dynamic zoom should be 0. [codepeople-post-map dynamic_zoom="0" zoom="5"]
type: Values allowed, SATELLITE, ROADMAP, TERRAIN and HYBRID. Select the type of map to display. [codepeople-post-map type="ROADMAP"]
language: Values allowed, en for English, es for Spanish, pt for Portuguese, etc. (for the complete list, check the Google Maps documentation). Select a language to display on map. [codepeople-post-map language="en"]
route: Values allowed, 0 or 1. Draw or not the route between points in a same post or page. [codepeople-post-map route="1"]
polyline: Values allowed, 0 or 1. Connect the points with polylines. [codepeople-post-map route="1" polyline="1"]
mode: Values allowed, DRIVING, BICYCLING and WALKING. Define the type of route. [codepeople-post-map route="1" mode="DRIVING"]
show_window: Values allowed, 0 or 1. To enable or disable the infowindows. [codepeople-post-map show_window="1" ]
show_default: Values allowed, 0 or 1. Display or not an infowindow expanded by default. [codepeople-post-map show_window="1" show_default="1"]
markerclusterer: Values allowed, 0 or 1. Displays a cluster with the number of points in an area. [codepeople-post-map markerclusterer="1"]
mousewheel: Values allowed, 0 or 1. Enables the map's zoom with the mouse wheel. [codepeople-post-map mousewheel="1"]
zoompancontrol: Values allowed, 0 or 1. Displays or hide the zoom controls. [codepeople-post-map zoompancontrol="1"]
typecontrol: Values allowed, 0 or 1. Displays or hide the type control. [codepeople-post-map typecontrol="1"]
streetviewcontrol: Values allowed, 0 or 1. Displays or hide the street-view control. [codepeople-post-map streetviewcontrol="1"]
trafficlayer: Values allowed, 0 or 1. Displays or hide a traffic layer over the map. [codepeople-post-map trafficlayer="1"]
defaultpost: Defines the post ID, for centring the map, and display by default the infowindow corresponding to the first point associated to this post. [codepeople-post-map defaultpost="396"]
center: To define the center of the map, but if the infowindows are configured to be opened by default, the map will be centered in the point with the infowindow opened. [codepeople-post-map center="40.7127837,-74.00594130000002"]
legend: Accepts a taxonomy name as value. Some common taxonomies names are: category and post_tag, for the categories and tags, respectively. Displays the legend with the list of elements that belong to the taxonomy and are assigned to the posts associated with the points. [codepeople-post-map legend="category"]
legend_title: Text to be used as legend title. [codepeople-post-map legend="category" legend_title="Select the categories to display on map"]
legend_class: Class name to be assigned to the legend. The legend design may be modified through CSS styles. Creates a class name, with the styles definition, and associates the new class name to the legend through the legend_class attribute. [codepeople-post-map legend="category" legend_class="my-legend-class"]
post_type: Post types separated by ",". Displays on map the points whose posts belong to the post types.[codepeople-post-map post_type="product"]
tag: Tags slugs separated by ",". Displays on map the points whose posts have assigned the tags.[codepeople-post-map tag="tag1,tag2,tag3"]
cat: Categories IDs separated by "," or -1. Displays on map the points whose posts belong to the categories. The special value -1, allows display on map all points defined in the website.[codepeople-post-map cat="2,4,56"][codepeople-post-map cat="-1"]
excludecat: Categories IDs to exclude, separated by ",". From points to be displayed on map, the plugin excludes the points whose posts belong to the categories to exclude. [codepeople-post-map tag="tag1,tag2" excludecat="4"]
excludepost: Posts IDs to exclude separated by ",". [codepeople-post-map cat="-1" excludepost="235,260"]
excludepost_type: In combination with other attributes like: cat, tag or taxonomy, it is possible to load on map only the points that do not belong to the post types in the list. [codepeople-post-map cat="-1" excludepost_type="post"]
excludetag: Tags IDs to exclude separated by ",". [codepeople-post-map excludetag="2,13"]
taxonomy: The taxonomy is a special attribute that should be combined with other attributes, depending of taxonomies to use for points filtering. Suppose the website includes two new taxonomies: taxonomyA and taxonomyB, and the map should display all points that belong to the posts with the value T1 for taxonomyA, and T3,T4 for taxonomyB, the shortcode would be: [codepeople-post-map taxonomy="taxonomyA,taxonomyB" taxonomyA="T1" taxonomyB="t2,t3"]
search_box: Includes a search box on the map for searching places: [codepeople-post-map search_box="1"]
kml: Absolute URL (http://...) to a KML file with the Keyhole Markup Language. [codepeople-post-map kml="http://www.yourwebsite.com/your-file.kml"]
Configure Shapes
Check the box over the "Insert the map tag" button.
Enter the stroke weight of shape.
Enter the color of shape.
Enter the opacity of shape.
Press with the mouse on map at right to draw the shape.
Hooks (Filters and Actions)
The plugin includes multiple hooks to allow the integration with third party plugins, or use the information stored in custom fields
cpm-complete-structured-query allows to modify the query that filters the posts with custom information
cpm-point-description to determine or modify the point description.
function point_description($description, $post_id)
{
    return 'Lorem ipsum dolor sit amet, consectetur adipiscing elit. Donec ac fermentum lectus.';
}
add_filter('cpm-point-description', 'point_description', 10, 2);
cpm-point-address to determine or modify the point address.
function point_address($address, $post_id)
{
    return 'New York, NY, USA';
}
add_filter('cpm-point-address', 'point_address', 10, 2);
cpm-point to modify the attributes of points.
// Modify the point's icon
function edit_point($point)
{
    $point['icon']='http://www.website.com/path-to-the-icon/new-icon.jpg';
    return $point;
}
add_filter('cpm-point', 'edit_point', 10);
cpm-point-infowindow-template to edit the infowindows template.
// Removes the description section from infowindows
function edit_infowindow_template($template, $point)
{
return str_replace("
cpm-point-infowindow to edit generated infowindows.
// Adds a new class name to the infowindow content
function edit_infowindow($infowindow, $point)
{
	return str_replace("class='cpm-content'", "class='cpm-content new-class'", $infowindow);
}
add_filter('cpm-point-infowindow', 'edit_infowindow', 10, 2);
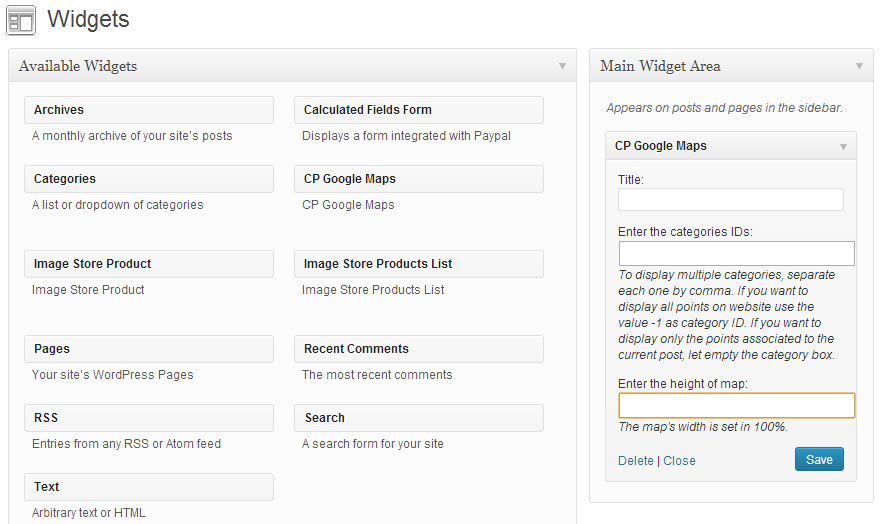
Inserting maps as widgets on sidebars
To insert the maps as widget on sidebars, go to the menu option "Appearance / Widgets", and drag the "CP Google Maps" widget to the sidebar.
It is possible define, for each map on sidebar, the categories IDs to display (optional attribute), and the height of map. The map's width is set to the 100% of sidebar.
Contact Form Builder (Developer version)
Contact Form Builder (Developer Version).
The Contact Form Builder lets you to add/edit/remove fields into the form and also to specify the validation rules for your form (required fields, email fields, etc...).
Form Processing / Email Settings:
Send email "From": Indicate if the email will be sent from a fixed email address or from the email address entered by the customer.
"from" email: The email used as from in the notifications (for fixed "from" addresses).
Destination emails (comma separated): List of administrators that will receive the email notification.
Use the email address associated to the point: Send the contact information to the email address associated to the point, in place of the destinations emails defined previously.
Email subject: Subject of the notification email.
Include additional information?: Optional information about the user IP and browser.
Thank you page (after sending the message): After the completing the payment the user may go back to a page into your website (usually a "thank you" page). Type the page address into this field.
Email format?: Select if the email will be sent as plain-text or HTML-formatted.
Message: Content of the notification email that you will receive. Keep the tag <%INFO%>, it will be replaced automatically with the form data send by the user.
Submit Button:
Submit button label (text): Text to display in the submit button.
Thank you (text): Text to display after submit the form.
Validation Settings:
This area contains the "texts" used for the validations. You can easily translate them to other languages.
Email Copy to User:
Send confirmation/thank you message to user?: Select if you want to sent the "confirmation/thank you" message to the user.
Email field on the form: Select here the field that contains the user's email on the form.
Email subject: Subject of the email sent to the user after payment
Email format?: Select if the email will be sent as plain-text or HTML-formatted.
Message: Content of the email sent to the user after payment. The tag <%INFO%> will be replaced by the information sent using the form, if needed.
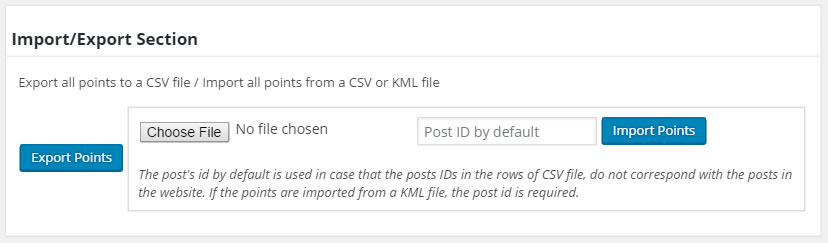
Import/Export points
Import/Export Section (Developer Version).
Through this section is possible export all points defined in the website to a CSV file, and import the points definitions from a CSV or KML file to the website.
To export all points to a file with CSV format, simply press the "Export" button, and select the location where the CSV file will be saved in your computer. The first row of the CSV file, contains the header with the names of the attributes of points
For importing a CSV or KML file with the description of points to the website, select the file to import, and it is recommended to enter a post/page id that will be used in case that the id of post associated to the point, were not present on website (if the file to import is in KML format the post id is required), and finally, press the "Import" button. The action displays a summary of the importation process, with the number of points imported, the rows that were modified to be inserted in the point by default, and the rows that have not been imported.
The first row of CSV file must contain the attributes list of the points. The complete list is:
From the previous list, the required attributes are:
"post_id","address","latitude","longitude"
Loading...
DOWNLOAD
Basic Version
Free
Doesn't use geolocation data for posts search
Allows to insert only one point for each post/page
Doesn't allow to correct the marker position visually on map
Doesn't allow to insert maps on templates
Allow to associate the maps to Page/Post only
Allow only one map for page
Allows to stylize the maps
Doesn't include technical support (60 days of support service can be purchased for EUR 25)
Direct download link. No registration required.
Developer Version
EUR
€49
99
Includes all the features present in the Professional Version
Allows design a Contact Form, and associate it with the points
Allows send notification emails with the information included in the form by the users
Allows associate an email address to the points, to contact a different person by each point, or a global email address to be notified from all points
Supports Contact Form 7 plugin's forms in the points' descriptions
Allows to use the image associated with the point as the point's icon on map
Allows to export all points defined in the website to a CSV file
Allows to import the points from a CSV or KML file
After payment you will be redirected to a direct-download page and the download link will be emailed to the payment address.
The cost of the pro version is a one-time payment required to download it. The one-time payment gives you right to use the
plugin in your websites for an unlimited time, access to future updates and access to 60 days of free technical support.
Professional
Version
EUR
€19
.99
Uses geolocation data for posts search
Allows to insert multiple map points for each post/page
Draws the route through points in the post
Allows create Shapes on map
Allows grouping multiple markers in clusters
Allows to display the location of user that visits the webpage
Displays Get directions link in infowindow, to get directions to the point
Displays the Open on map link in infowindow to load the point directly on Google Maps
Displays a street view link in infowindow to display the street view of specific point
Allows to associate the maps to any public Post Type in the WordPress
Allows to insert maps directly on templates
Allows to display a map for each post in a non singular webpage like: homepage, archive page,search result, etc.
Allows to insert the map as a widget on sidebars
Allows generate points dynamically from geolocation information stored in the image's metadata
Allows to display points on map from geolocation information assigned to the posts by WordPress App
Allows to associate a legend to the maps with categories, tags or custom taxonomies, to show and hide the points on map
Allows to includes a search box on the map for searching places
Allows to export all points defined in the website to a CSV file
Allows to import the points from a CSV or KML file
Allows to load a KML layer on the map from a KML file
Includes 60 days of technical support
After payment you will be redirected to a direct-download page and the download link will be emailed to the payment address.
The cost of the pro version is a one-time payment required to download it. The one-time payment gives you right to use the
plugin in your websites for an unlimited time, access to future updates and access to 60 days of free technical support.