Product type: Wordpress Plugin
Image Store
Installing and using the Free version of Image Store
Installing and using the Premium version of Image Store
Installation
To install Image Store, follow these steps:
- Download and unzip the plugin
- Upload the entire "cp-image-store/" directory to the "/wp-content/plugins/" directory
- Activate the plugin through the "Plugins" menu in WordPress
- Set up your store via "Image Store/ Store Settings"
Setting up the Image Store
Image Store is configured through the menu: "Image Store / Store Settings". The setup window allows configuring the Image Store's General data, PayPal data for sales processing and data used for notifications of sales. In the Premium version of the plugin you can also set discounts and coupons.
Settings Interface
The setup interface includes the following fields:
Store Page Setup
This section contains the setup options for the Image Store.
- URL of Store page: Enter the URL of the web page where the Image Store was inserted. The URL of the store will be used to enable return from the product page to the store page.
- Store layout: Allows select the layout to use in the stores page.
- Allow filtering by type: Inserts a field in the web page of the Image Store to filter images by type (possible types of images: Clip Art, Photo, Draws, Vectors, etc.)
- Allow filtering by color: Inserts a field in the web page of the Image Store to filter the products by their color scheme (color schemes possible: Full color, Black and White, Sepia, etc.)
- Allow filtering by authors: Inserts a field in the web page of the Image Store to filter products by their author.
- Allow filtering by category: Inserts a field in the web page of the Image Store to filter products by their category.
- Allow pagination: Allows pagination in the Image Store.
- Items for page: Defines the number of products per page in the Image Store.
- Share in social networks: Display a group of buttons for sharing the products in the social networks(like Facebook, Twitter and Google+)
- Facebook app id for sharing in Facebook: App id for sharing the website's links in Facebook.
Images Setup
This section includes setup options for each of the images.
- Units: Unit of measure for the images to be displayed in the Image Store and on the page of the image.
- Set watermark: Mark this checkbox if you want to display a watermark on image previews.
- Watermark text: Enter the text for the watermark.
- Watermark position: Allows display the watermark at bottom or middle of the images previews.
- Thumbnail width: Width of the thumbnail in pixels.
- Thumbnail height: Height of the thumbnail in pixels.
- Intermediate width:
- Intermediate height: Height of the image preview in pixels.
- Image License title: Enter a title for the license of the images sold through the Image Store. The title of the license is used as a link to display the license.
- Image License description: Enter the text of the license.
Images Effects
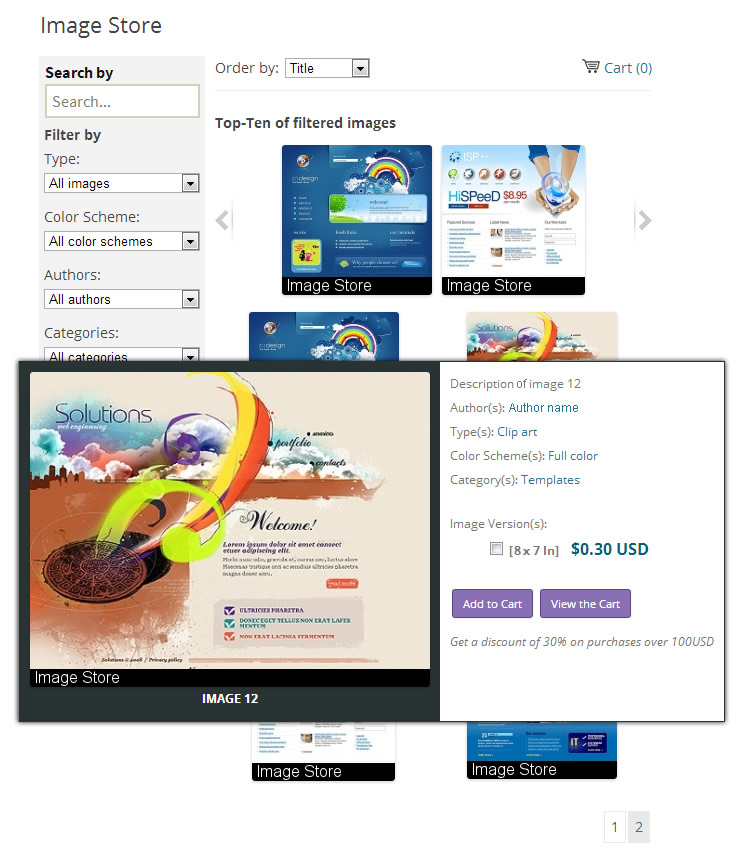
- Show caroussel of related images: Shows a carousel with the top 10 images given the filter values in the Image Store, and displays the carousel on the image page with the top 10 images that belong to the same category.
- Set caroussel autorun: Starts moving carousel dynamically by default.
- Carousel transition time: Number of seconds before the rotation of each image in the carousel.
- Display preview on mouse over: Shows the image information, buy buttons, and the image preview when the mouse is hovered over the thumbnail.
PayPal Payments Setup
This section defines the options for the payment gateway.
- Enable PayPal Payments: Allows the sale of products through PayPal.
- PayPal Sandbox Enable: Enables Paypal's Sandbox to test the payment system before publishing the Image Store.
- PayPal email: Enter the email address associated with your PayPal account.
- Currency: The currency in which payments are accepted and the prices shown in the Image Store.
- Currency Symbol: Symbol of the currency in which payments are accepted and prices shown in the Image Store.
- PayPal Language: Language in which PayPal will be loaded.
- Use shopping cart: Activate the shopping cart to allow purchase of several products at once.
- Download link valid for: Enter the number of days during which the generated download link will be valid; past this number of days the download link will expire.
- Number of downloads allowed by purchase: Set the number of downloads allowed by product's purchased.
- Use safe downloads: Require that customers type the email address used to purchase the images before download.
- Pack all Purchased image files as a single ZIP file: You can group all products purchased in one compacted file.
Discount Settings
This section allows to set up discounts in your Image Store.
- Display discount promotions in the image store page: Allows to display the text of the promotion on the store page.
- Scheduled Discounts: List of defined discounts. Here you can edit or delete existing discounts.
- Percent of discount: Percentage of the price that will be discounted.
- Valid for sales over than: The discount will apply to sales where the total amount exceeds the number entered in this field.
- Valid from: Starting date of the promotion.
- Valid to: End date of the promotion.
- Promotional text: Promotional text that will be shown on the store page.
Coupons Settings
This section allows to set up a discount coupon system for your Image Store.
- Coupons List: List of coupons that you already created. Here you can edit or delete existing coupons.
- Percent of discount: Percentage of the price that will be discounted.
- Coupon: Enter the discount code here.
- Valid from: Starting date of the promotion.
- Valid to: End date of the promotion.
Notification Settings
This section contains data necessary for notifications: for buyers when a payment is completed, and to the store manager to inform you of a new sale.
- Notification "from" email: E-mail address to be shown as the Sender of notifications.
- Send notification to email: Email address where a notification is sent after each sale.
- Subject of user confirmation message: Subject of the confirmation message sent to the customer after each purchase.
- Email confirmation to user: Contents of the email message sent to the customer after a purchase is made. The content must include %INFORMATION% text that will be replaced by the purchase data.
- Subject of notification message to admin: Subject of the notification email sent to the administrator when a purchase is made.
- Email notification to admin: Contents of the message sent to the administrator when a purchase is made. Email content must maintain %INFORMATION% text that will be replaced by the purchase data.
Into the body of notification emails it is possible to include other two constants: %DATETIME% that would be replaced by the purchase date/time, and "%BUYERNAME%" that would be replaced by the first name and last name of the buyer (if there is an user in the website with the payer's email).
Importing Area (Experimental Module)
This module is experimental and allows to import all products and their data at the same time.
Simply upload to your server a directory with all images and a XML file to define the products, with their data and attributes. The directory should be accessible and it can be deleted after completing the importing process. After upload the directory with the data, enter in the field above, the absolute URL to the XML file, and press the "Import" button.
The structure of the XML file is:
<?xml version="1.0" encoding="utf-8"?>
<products>
	<product>
		<title>Title of the first product</title>
		<description>Description of the first product</description>
		<author>Name of the first product author</author>
		<type>Type of product (Clip art, Line drawing, etc.)</type>
		<color>Scheme color (Full color, Black and white, etc.)</color>
		<thumbnail>first_thumbnail.jpg</thumbnail>
		<image width="number" height="number" price="number">first_image_for_selling.jpg</image>
		<image width="number" height="number" price="number">second_image_for_selling.jpg</image>
		<image width="number" height="number" price="number">third_image_for_selling.jpg</image>
	</product>
	<product>
		<title>Title of the second product</title>
		<description>Description of the second product</description>
		<author>Name of the second product author</author>
		<type>Type of product (Clip art, Line drawing, etc.)</type>
		<color>Scheme color (Full color, Black and white, etc.)</color>
		<thumbnail>second_thumbnail.jpg</thumbnail>
		<image width="number" height="number" price="number">first_image_for_selling.jpg</image>
		<image width="number" height="number" price="number">second_image_for_selling.jpg</image>
		<image width="number" height="number" price="number">third_image_for_selling.jpg</image>
	</product>
</products>
- Each <product></product> node represents a product in the store.
- The URLs to the thumbnails and images must be relative to the XML file.
- The nodes: author, type, and color will generate new terms associated to the products.
- There are multiple image nodes associated to a same product, because it is possible to sell different formats of an image from a same product, the width, height and price are the attributes of the images displayed in the public website, and its corresponding price.
Creating content
Inserting a new image in the store
To insert an image in the store, press the menu option "Image Store / Images for Sale" which will show a list of previously entered images and associated data.
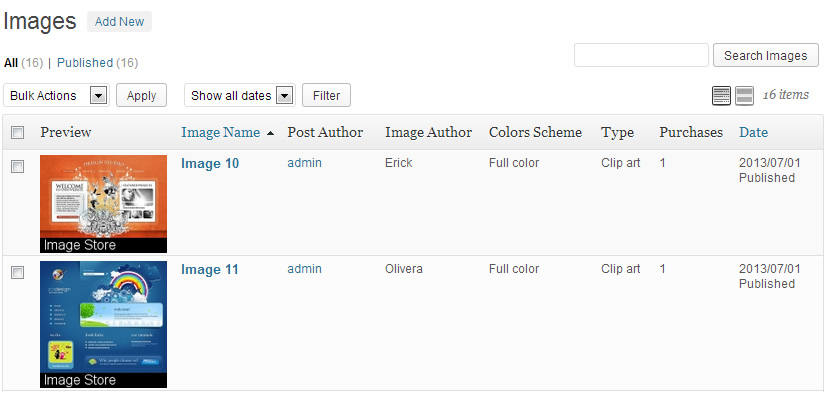
Image Store products section
To enter a new image, press the "Add New" button.
The interface for entering data of an image is as follows:
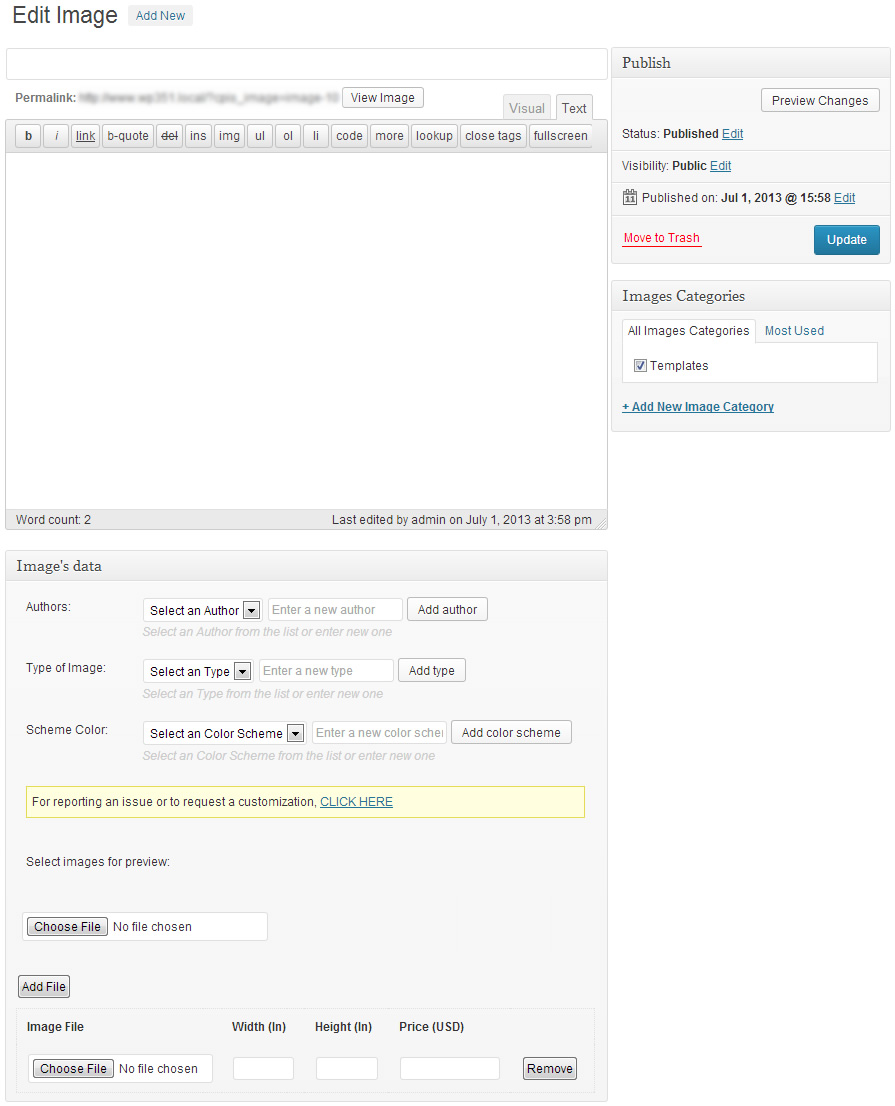
Product insertion
- Enter Title Here: Enter the title of the image.
- Description: Enter the description of the picture. This field is optional, but many users take advantage of it when they want to give additional information about the image.
- Authors: Select the author or authors of the image. You can also add new authors.
- Type of Image: Select the type or types of image. You can also add a new image type.
- Scheme color: Select the color scheme of the image. You can also add a new color scheme.
- Images categories: Select a category or categories to which the image belongs or enter new categories. Categories can have a hierarchy.
- Select image for preview: Select the image to be edited to create its thumbnail and a preview image. If your version of the Image Store allows the use of watermark, it will be applied to the image.
- Image files: list of files associated with the image. If you wish to sell more than one version of the same image, add a new file for each of these images. This option allows the sale of the same image in different resolutions at different prices.
For each image file you can enter its width, height and price.
Publishing the Image Store
The Image Store can be posted on a page or post in WordPress. To insert the Image Store, go to the appropriate section (page or post) and create a new page / post.
The image store adds two new icons on the post / page content editor. The first of the icons serves to insert the Image Store, the second - to insert a particular image.
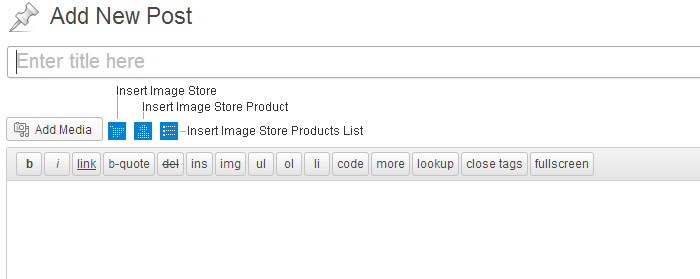
Insertion icons
The button for the insertion of the Image Store creates a shortcode in the content of the post / page in the form: [CodePeople-image-store]
The shortcode accepts a group of attributes to determine the products to display in the form by default (after display the store on page its products can vary if are modified the options for filtering)
- search: Display the images with the term in the image description, or title. [codepeople-image-store search="people"]
- type: Accepts the slug of image type, and display the images associated with this type. [codepeople-image-store type="clip-art"]
- color: Accepts the slug of color, and display the images associated with this color. [codepeople-image-store color="full-color"]
- author: Accepts the slug of image author, and display the images that belong to the author. [codepeople-image-store author="photographer-name"]
- category: Accepts the slug of category, and display the images that belong to the category. [codepeople-image-store category="category-name"]
- carousel: Displays or hides the images carousel in the store's page. Values allowed 1 or 0. [codepeople-image-store carousel="1"]
- show_search_box: Displays or hides the search box in the store's page. Values allowed 1 or 0. [codepeople-image-store show_search_box="1"]
- show_type_filters: Displays or hides the option for filtering the images for type in the store's page. Values allowed 1 or 0. [codepeople-image-store show_type_filters="1"]
- show_color_filters: Displays or hides the option for filtering the images for colors in the store's page. Values allowed 1 or 0. [codepeople-image-store show_color_filters="1"]
- show_author_filters: Displays or hides the option for filtering the images for author in the store's page. Values allowed 1 or 0. [codepeople-image-store show_author_filters="1"]
- show_category_filters: Displays or hides the option for filtering the images for category in the store's page. Values allowed 1 or 0. [codepeople-image-store show_category_filters="1"]
- show_ordering: Displays or hides the box for ordering the images in the store's page. Values allowed 1 or 0. [codepeople-image-store show_ordering="1"]
The button for inserting an image allows to enter the ID of the image and select the layout of the product to be displayed.
Furthermore of the Classic Editor, the plugin allows the specific integration with the following editors:
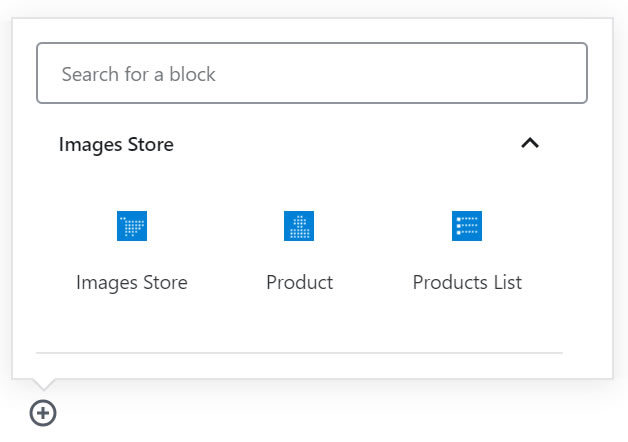
Gutenberg Editor:
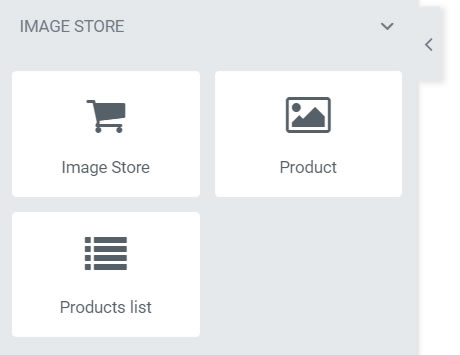
Elementor Editor:
Page Builder by SiteOrigin:

For other editors, the shortcodes should be inserted using other controls of general purpose, like the controls for inserting HTML or shortcodes.
Publishing a particular image
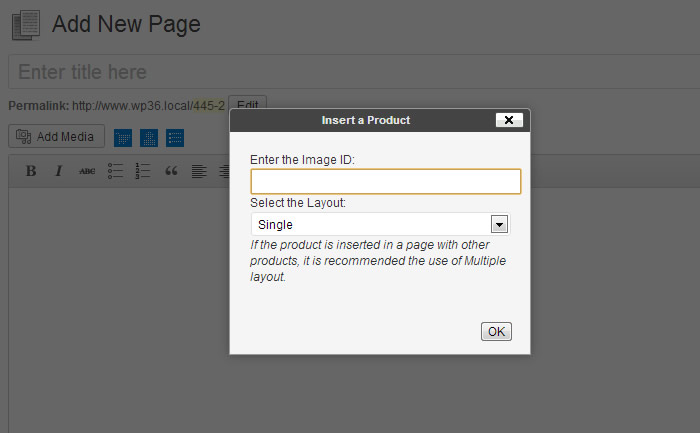
Dialog for image's insertion
To promote an particular image from other website's pages, or sidebars, there is available a icon over the pages/posts content. Pressing the icon is displayed a dialog for type the image's ID.
If you want to insert the image on the website sidebars, there is available a widget in the widgets section.
Insert a product and product list on a web page and sidebars
Publishing a list of images (Available only in the Premium version)
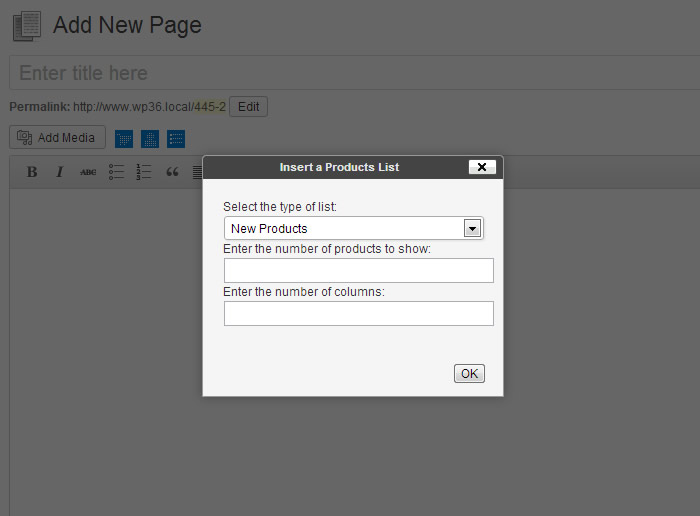
Dialog for images list insertion
To insert a list of images filtered by top selling or newest images, there is available a icon over the pages/posts content. Pressing the icon is displayed a dialog for select the filter option and type the number of images to display and the columns to distribute the images.
If you want to insert the images list on the website sidebars, there is available a widget in the widgets section.
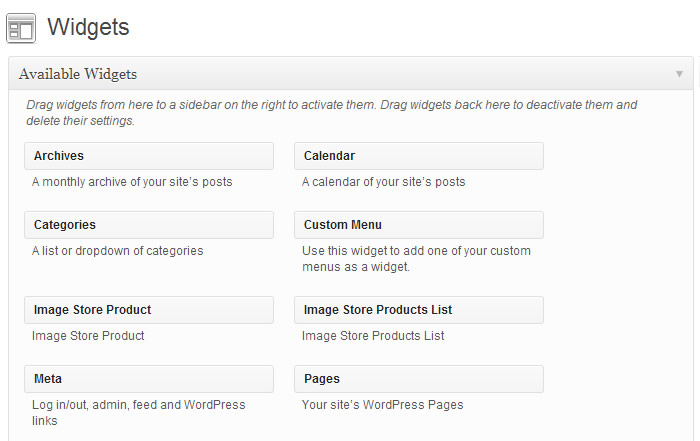
Widgets section
Sales statistics
When a sale takes place, a notification is emailed to the Image Store administrator, but sales reports can also be viewed. To do this, go to the menu option "Image Store / Sales Report".
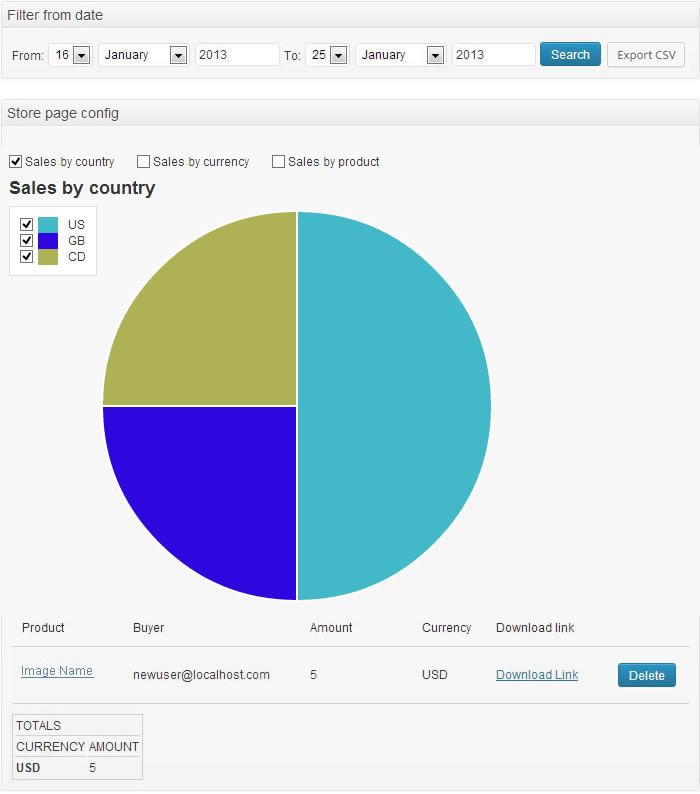
Sales reports
The reports section allows to filter sales by period, and buyers. By default, current day's sales are shown, but it also displays sales' totals for the selected period, and the currency in which items were sold.

Filter sales
The statistics module allows to display animated charts for specific reports.
This module includes the "Export CSV" button for exporting the sales reports (that satisfy the filtering options), to a CSV file.
You can delete a sales report from the list of sales. This may be needed in case of a refund, to make sure that your sales statistics reflect the real situation with the updated figures.
Affiliate Royale Add On
The add on allows integrate the Store with the Affiliate Royale plugin (both plugins must be installed in the website)
Affiliate Royale is a complete Affiliate Program plugin for WordPress. Use it to start an Affiliate Program for your products to dramatically increase traffic, attention and sales. Once you launch your affiliate program with Affiliate Royale you'll be able to easily track your affiliates to see how they're doing. You'll see how many clicks they're driving, sales they're making and how much to pay them at the end of each month.

Affiliate Royale Section in the store's settings.