
- Calendars
- Appointment Booking Calendar
- Booking Calendar Contact Form
- CP Multi View Calendar
- Content Tools
- Music Store
- Sell Downloads
- Image Store
- Search In Place
- Theme Switch in Mobile and Desktop
- Corner Ad
- Loading Page
- CodePeople Post Map
- Related Posts
- Music Player for WooCommerce
- Music Player for Easy Digital Downloads
- Galleries
- Smart Image Gallery
- Forms
- CP Contact Form with PayPal
- Calculated Fields Form
- CP Easy Form Builder
- Contact Form to Email
- CP Polls
- Payment Form for PayPal Pro
- Themes
- CodePeople Light
- Food & Diet
- Custom requests
- Quote for custom Calculated Fields formulas

CP Multi View Calendar
Frequently Asked QuestionsQuestions
Answers
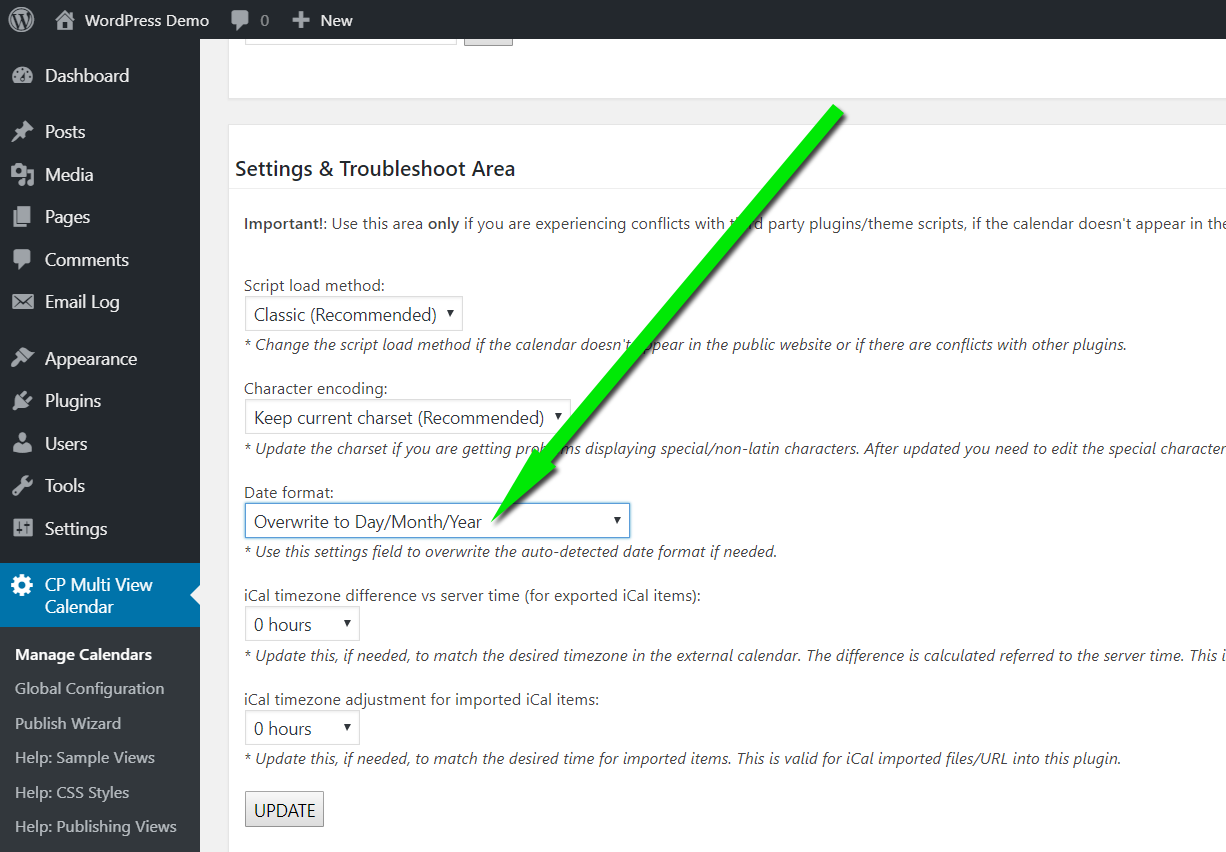
The easy way is to use the "Troubleshoot Area" located below the list of calendars to overwrite the default date format detected for the language used. Screenshot of the settings field location:
While the above is the easy way that works for most cases of use, there is also an advanced way to fully customize it as needed. Instructions below:
Open your language file "wp-content\plugins\cp-multi-view-calendar\DC_MultiViewCal\language\multiview_lang_xx-XX.js", where xx-XX in the file name is your language identifier and into that file modify the items marked in red below:
"fulldaykey": "MMddyyyy",
"fulldayshow": "L d yyyy",
"fulldayvalue": "M/d/yyyy",
"Md": "W M/d",
"nDaysView": "M/d",
"Md3": "L d",
"separator": "/",
"year_index": 2,
"month_index": 0,
"day_index": 1,
...change to this:
"fulldaykey": "ddMMyyyy",
"fulldayshow": "d L yyyy",
"fulldayvalue": "d/M/yyyy",
"Md": "W d/M",
"nDaysView": "d/M",
"Md3": "d L",
"separator": "/",
"year_index": 2,
"month_index": 1,
"day_index": 0,
If you want to setup the calendar editable only by some users in the public website then publish a view of the calendar in a private page (restrict the access to the page with the calendar with "Edition" enabled).
You can have multiple views of the same calendar, one for read-only public access and another view with edition enabled on a private page accessible only by registered users.
Note that there are two different concepts here:
- A calendar: This is a unit of information and events. The events aren't shared with other calendars.
- A calendar's view: This is the way a calendar is displayed. The same calendar can have multiple views in the same page or in different pages. Since the calendar unit is the same the data is shared between all views but the visual settings and features can be different.
See also this other FAQ entry about additional permissions settings (pro version only).
Use the following configuration parameter:
date_box_with_color_in_nmonth_view:true
The parameters should be added into the "Other Parameters" box. These parameters must be comma separated and will overwrite the initial configuration selected for the calendar.
The "Other Parameters" box can be found in the following location:
Open the file "wp-content/plugins/cp-multi-view-calendar/DC_MultiViewCal/css/main.css" and add this CSS rule at end of the file:
#multicalendar .rb-i{white-space:normal}
The Commercial Version supports iCal. Automatic exports can be configured to third party calendars like Google Calendar. The import option (from a third party calendar into the CP Multi View Event Calendar) is available also in manual and automatic mode.
To automatically export the CP Multi View Event Calendar to Google Calendar please read the instructions on this Google page:
https://support.google.com/calendar/answer/37100?hl=en
To get the iCal feed URL right click the "iCal" link on the calendar administration page and copy it.
Note: This will automatically export the bookings stored in the plugin to the Google Calendar. The inverse process (import the items on Google Calendar into the plugin) is also available in the Platinum version of the plugin.
In the Commercial version the default permissions in the public calendar - when the edition is enabled - are as follow:
- Administrators can add/edit everything
- Other WordPress users - logged in users - can add events and edit/delete ONLY their own added events
Those default permissions can be adjusted by using the configuration parameters "userAdd, userEdit, userDel, userEditOwner, userDelOwner". For example if you want to allow all logged in users to add events but remove the access to edit or delete their own events then add the following parameters into the "Other Parameters" box. These parameters must be comma separated and will overwrite the initial configuration selected for the calendar:
userEditOwner:false,userDelOwner:false
The "Other Parameters" box can be found in the following location:
See also this other FAQ entry about restricting the calendar only to some user levels.
The following parameters are available only in the Professional version of the plugin:
- Parameter "user" is for loading the calendar assigned to a specific user. This will overwrite the calendar ID selected for the view, example:
[CPMV_CALENDAR view="1" user="admin"]
- Parameter "currentuser" is for loading the calendar assigned to the user currently logged it. This will overwrite the calendar ID selected for the view, example:
[CPMV_CALENDAR view="1" currentuser="true"]
The Commercial Version allows to setup reminder for events. When editing an event the following options are available:
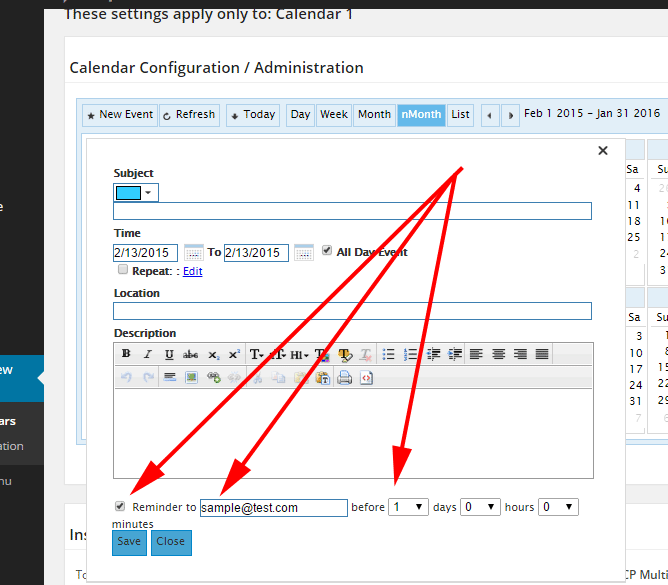
Using those options a reminder can be send to the specified email address with the specified time interval before the event. Multiple email addresses can be indicated separated by comma. The logged in user email address - if any - appears pre-filled in the reminder email field when creating a reminder.
There is also an area to edit the content of the reminder email. The button for accessing that option is located in the calendars list for each calendar and points to a page with the following options:
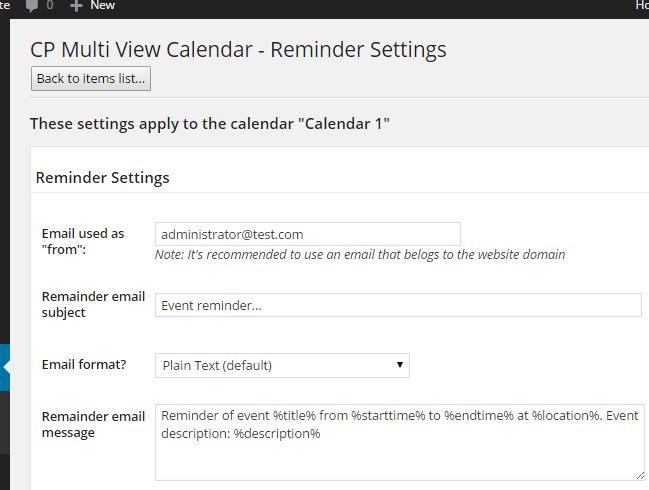
The following tags can be used into the reminder email subject and content:
- %title%: This tag will be replaced by the event title
- %starttime%: This tag will be replaced by the event start time
- %endtime%: This tag will be replaced by the event end time
- %location%: This tag will be replaced by the event location
- %description%: This tag will be replaced by the event description
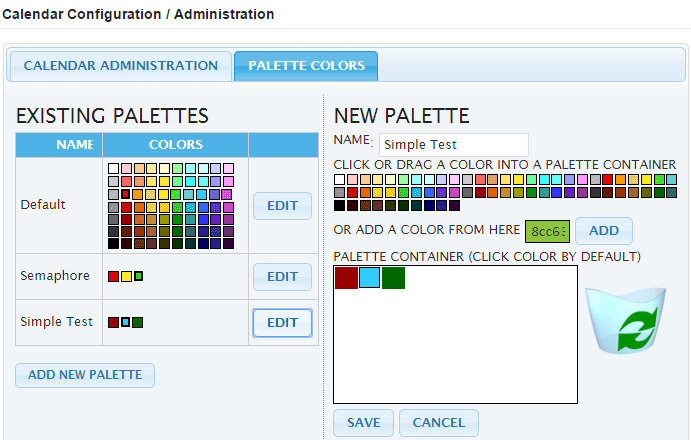
The Commercial Version supports multiple color palettes. That way you can easily modify the colors used by the events without having to edit all the events again and you can have different calendar views using different color palettes.
The color palettes administration area is located under the menu "CP Multi View Calenadar - Global Configuration - Color Palettes" and the palette configuration page looks like the following screenshot:
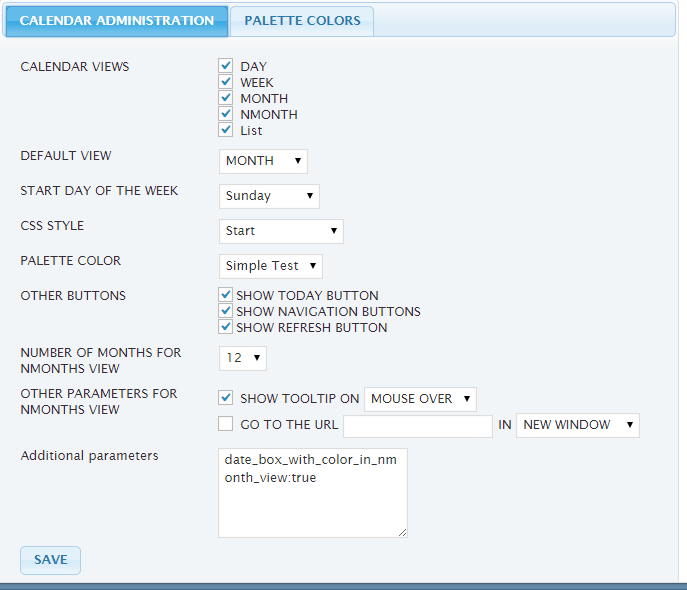
The Commercial Version allows to set the configuration options for the calendar used in the administration area. This way you can change the default view for the administration calendar, its buttons, styles and basically all the configuration options already available for the calendars in the public website.
The configuration of the administration calendar can be accessed through the menu "CP Multi View Calendar - Global Configuration - Calendar Administration" and looks like the following screenshot:
Into the "nMonth View" you can pass the clicked date as parameter as part of the linked URL. To do this mark the checkbox "Go to the url", specify the URL and to pass the date as parameter add the tag "the_current_date", for example, if you want to send the selected date to the following URL:
http://www.your-domain.com/view.php
... then specify it in this way:
http://www.your-domain.com/view.php?date=the_current_date
... and "the_current_date" will be automatically replaced by the clicked date.
-
date_box_with_color_in_nmonth_view: Marks day with the event color in nMonth view.
values: true,false
Example: date_box_with_color_in_nmonth_view:true -
dayWithColumns: Multi-column day view based in location or title, view more details in this demo:
values: "","dc_subjects","dc_locations"
Example: dayWithColumns:"dc_subjects" -
dialogWidth: The tooltip panel's width.
values: number
Example: dialogWidth:300 -
height: Height for the views "day", "week", "month", "nDays"
values: 0 for automatic height, other number
Example: height:500 -
hoursEnd: Latest hour displayed in the views "day", "week", "month", "nDays"
values: 0,1,2...,22,23
Example: hoursEnd:19 -
list_end: Used to indicate the latest event in the "list" view.
values: "","now" or string compatible with strtotime (php function).
Example: list_end:"now" -
list_eventsPerPage: Indicates the number of events on each page for the "list" view
values: number
Example: list_eventsPerPage:10 -
list_order: Indicates the order of the events in the "list" view.
values: "asc" or "desc"
Example: list_order:"asc" -
list_readmore_numberofwords: Indicates the amount of words to display for each event in the "list" view.
values: 0 = unlimited, or other number
Example: list_readmore_numberofwords:20 -
list_start: Used to indicate the time of the latest event in the "list" view.
values: "","now" or string compatible with strtotime (php function).
Example: list_start:"now" -
list_totalEvents: Indicates the number of events in the "list" view.
values: 0 = unlimited, or other number.
Example: list_totalEvents:3 -
maxdate: The maximum visible date in the day, week, month, nMonths views.
values: "" or date with that format yyyy-mm-dd .
Example: maxdate:"2020-12-31" -
militaryTime: Used to indicate the time format.
values: true,false
Example: militaryTime:false -
mindate: The minimum visible date in the day, week, month, nMonths views
values: "" or date with that format yyyy-mm-dd .
Example: mindate:"2015-01-01" -
navigateurl: In the "nMonth" view if the parameter "shownavigate" is "true" allow to navigate to the URL specified here. If the tag "the_current_date" is being used it will be replaced by the selected date. More details in this FAQ entry
values: "" or URL.
Example: navigateurl:"http://www.your-domain.com/view.php?date=the_current_date" -
numberOfDays: Indicates the number of days to display in the "nDays" view, 10 days is the default value.
values: number
Example: numberOfDays:10 -
numberOfMonths: Indicates the number of months to display in the "nMonths" view
values: number
Example: numberOfMonths:12 -
readonly: Indicates if the edition if the calendar is readonly or if edition is allowed.
values: true, false
Example: readonly:false -
rowsByCategory: For the "day", "week" and "nDays" views, enable the category rows and indicates if the rows will be based in "location" o "subject"
values: "","dc_locations" or "dc_subjects"
Example: rowsByCategory:"dc_locations" -
shownavigate: Indicates if the dates can be linked to an URL in the "nMonth" view
values: true, false
Example: shownavigate:true -
showtooltip: Indicates if the tooltip panel will be shown in the "nMonth" view.
values: true, false
Example: showtooltip:true -
showtooltipdwm: Indicates if the tooltip panel will be shown in the "day", "week", "ndays" and "month" views.
values: true, false
Example: showtooltipdwm:true -
target: Indicated - for the "nMonth" view - if the navigation to external URLs will be made in the same window or in a new window
values: 1=same window, 0=new window
Example: target:1 -
tooltipon: Indicates - for the "nMonth" view - if the tooltip panel will be shown in the "click" or "mouseover" event.
values: 1=clic, 0=mouseover
Example: tooltipon:0 - :
view: Indicates the default view
values: "day","week","month","nMonth","nDays,"list"
Example: view:"month" -
viewDay: Indicates if the "day" view will be shown.
values: true, false
Example: viewDay:true -
viewList: Indicates if the "list" view will be shown.
values: true, false
Example: viewList:true -
viewMonth: Indicates if the "month" view will be shown.
values: true, false
Example: viewMonth:true -
viewNavigation: Indicates if the navigation buttons will be shown
values: true, false
Example: viewNavigation:true -
viewNDays: Indicates if the "ndays" view will be shown.
values: true, false
Example: viewNDays:true -
viewNew: Indicates if the "new" button will be shown.
values: true, false
Example: viewNew:true -
viewNMonth: Indicates if the "nMonth" view will be shown
values: true, false
Example: viewNMonth:true -
viewRefresh: Indicates if the "refresh" button will be shown.
values: true, false
Example: viewRefresh:true -
viewToday: Indicates if the "Today" button will be shown.
values: true, false
Example: viewToday:true -
viewWeek: Indicates if the "week" view will be shown
values: true, false
Example: viewWeek:true -
viewWeekDays: Indicates which weekdays will be shown in the "week" view. The first item is the Sunday.
values: array like this [1,1,1,1,1,1,1]
Example: viewWeekDays:[0,1,1,1,1,1,0] -
weekstartday: Indicates wich is the start day of the week (0,1,2,3,4,5,6), 0 means Sunday.
values: 0, 1, 2, 3, 4, 5 or 6
Example: weekstartday:1
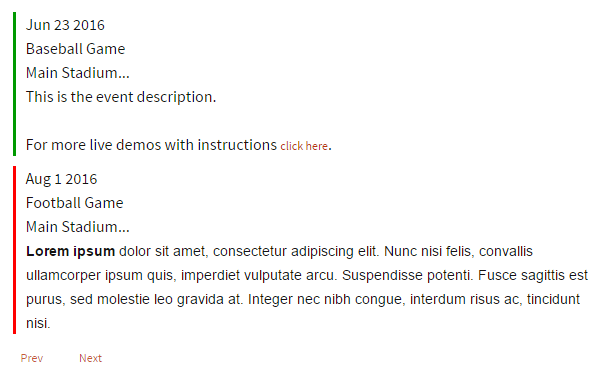
The List View is available in the commercial versions of the plugin and can be tested in the online demo.
The following is an screenshot of the List View (look & feel can be customized):
Installation Instructions:
- If you already have installed the free version or an old version of the pro version then delete it before installing the new pro version.
- Install the pro version via the Plugins area >> Add New >> Upload
Note: The above is a safe process, the plugin's data and settings won't be lost during the process and will appear again after installed the pro version.
Alternative Installation Method:
- Overwrite (or copy if not previously installed) the plugin files into the WP plugins folder through a FTP connection. This is also a safe process, the plugin's data and settings won't be lost during the process.
Upgrade Instructions:
The upgrade instructions are exactly the same instructions mentioned above but be sure to make a backup copy of your current files if you have made custom modifications to the files or translations since the files will be overwritten.
After upgrading the plugin remember to clear your browser cache.
The free version must be deleted before installing the pro version.
If you are upgrading the pro version to a new version you should also remove the previously installed version.
This is a safe step, the plugin's data and settings won't be lost during the process.
Another alternative is to overwrite the plugin files through a FTP connection. This is also a safe step.